

Organization Settings
Use the links below to jump to the setup area you need.
- Identity & Branding
- Payment & Financial Configuration
- Understanding the Billing Page
- Users & Permissions
- Organization-Wide Advanced Settings
- Messaging Defaults
- Connected Apps
A user is a staff member with a unique Activity Messenger account. Each user must have their own email address and mobile phone number. Sharing logins is not recommended. Permissions determine what each user can access and modify within the platform.

Open Users & Permissions
You can open Users and Permissions from either location:
-
 Cogwheel beside your Organization name > Users & permissions
 -
Staff > Users & permissions
Covered in this Guide:
Use this section to quickly find the user or permission setting you need.
- Adding Users
- Importing a List of Users
- Editing the User Invitation Email
- How Permissions Work
- Permission Levels
- Granular Permissions
- Updating a User’s Information
- Email Invitation Not Received
- Removing Access
- Sending Messages to Users
- Generating a Dashboard Instructor Message
- User Attribution Decision Guide
- Importing Users From Amilia
Adding Users
You can invite new staff members via email to create their own accounts.
Step 1 — Open the Users Menu
-
Click
Settings > Users in the main navigation, or go to Staff > Users
Step 2 — Add a New User
-
Click the (+) Add User button. Enter the staff member’s email address and send the invitation.
- You can also import a list of users. See the section below.
💡 Tip: Customize the invitation email by clicking the Customize Invitation button at the top of the user table.
Step 3 — Wait for Activation
-
The user must accept the invitation to access your Organization.
Importing a list of users
You can import a list of users instead of adding each staff member manually.
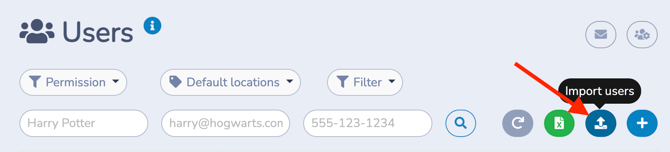
This is useful when you need to add many users at once, such as instructors, camp staff, coaches, seasonal employees, or front-desk staff.
To import users:
- Go to Staff > Users.
- Click Import.
- Follow the on-screen instructions.
- Download and fill out the Excel sample.
- Add each user’s information to the spreadsheet.
- Choose whether to check Send an invitation email.
- Check this option if you want imported users to receive an invitation immediately.
- Leave it unchecked if you want to send invitations manually later, one user at a time. - Copy your completed spreadsheet data from Excel and paste it into Activity Messenger.
Each imported user can then receive an invitation to activate their Activity Messenger account.
Before importing, make sure each user has their own email address. Sharing logins is not recommended because permissions, access, and user activity should be managed separately for each staff member.
Editing the user invitation email
You can customize the invitation email sent to new users when they are invited to Activity Messenger.
Use this option when you want to add Organization-specific instructions, onboarding context, or a short welcome message for new staff.
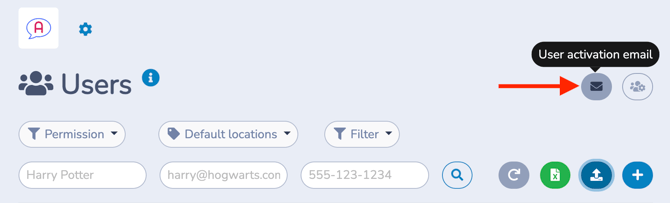
To edit the invitation email:
- Go to Staff > Users.
- Click the message icon in the top right corner.
- Edit the invitation message.
- Save your changes.
The customized message is used when new users are invited to create their Activity Messenger account.
This can be helpful when onboarding instructors, camp staff, administrators, or seasonal employees who may need extra context before signing in for the first time.
How permissions work
Activity Messenger uses two permission layers:
1. Permission level: the user’s base role.
2. Granular permissions: optional fine-tuning for specific actions.
A permission level defines the user’s default access in Activity Messenger. Each permission level includes implicit permissions that are permanently attached to that role.
Granular permissions can be used to extend access where allowed, but they cannot remove or override the implicit permissions included with the user’s permission level.
Use permission levels to choose the user’s general role. Use granular permissions only for specific exceptions or additions.
Permission Levels
Activity Messenger provides predefined permission levels for common staff roles.
Each permission level includes built-in permissions that define what the user can access and manage by default.
The table below summarizes the permissions inherently included with each role. The next section explains which granular permissions can be added or adjusted independently.
| Permission level | Best for | Included access |
|---|---|---|
| Account Owner | Primary Organization administrators | Full access to platform features, settings, data, billing, financial reports, staff management, integrations, and Organization settings |
| Administrator | Managers who need broad operational access | Can manage users with Instructor or Guest permissions, but does not access Billing |
| Attendant | Front desk or POS staff | POS, bookings, invoices, attendance lists, participant moves, messaging, limited financial reports for cash register closing |
| Communications Agent | Marketing or communications staff | Email/SMS sending and message templates, without billing, financial reports, or administrative settings |
| Instructor | Coaches, teachers, instructors | Attendance tracking, assigned forms, assigned courses, limited messaging |
| Instructor without messaging | Instructors who should not send messages | Same as Instructor, but without messaging |
| Accountant | Finance staff | Financial reports and invoices, without staff management, messaging, or configuration settings |
| Guest | External recipients or BCC-only users | No platform access, can be included as BCC recipient |
💡 Tip: Use a test account with a different email address to explore how each permission level behaves. Opening the platform in a private or incognito browser window makes this easier.
Granular Permissions
Permission levels define a user’s core capabilities. Use granular permissions only to add specific actions where permitted, not to remove or bypass role restrictions.
In addition to predefined permission levels, Activity Messenger allows you to fine-tune what each user can do using granular permissions.
Granular permissions let you enable or restrict specific actions without changing the user’s overall permission level. This is useful when a staff member needs access to certain features, but not full administrative rights.
Who can manage granular permissions
-
Account Owners can manage all permissions.
-
Administrators can manage granular permissions for users they are allowed to edit.
How granular permissions work
Each permission controls access to a specific action or feature in the platform, such as:
-
Managing users
-
Issuing refunds or credits
-
Accessing financial reports
-
Editing forms or the microsite
-
Managing memberships and schedules
-
Viewing or editing admin-only form answers
These permissions appear as a checklist in the user profile and can be adjusted individually using the edit (pencil) icon.
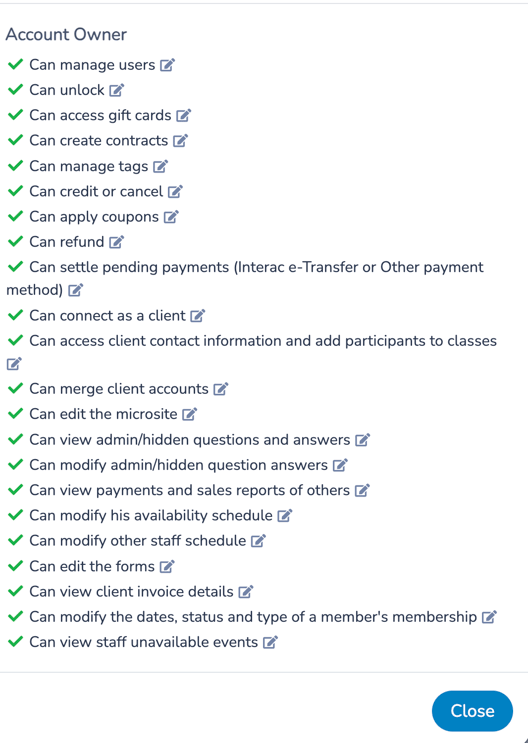 Examples of granular permissions
Depending on the user’s role, you may allow or restrict actions such as:
-
Manage users
-
Unlock client accounts
-
Access gift cards
-
Create contracts
-
Apply coupons
-
Issue credits or refunds
-
Settle pending payments (e.g., Interac e-Transfer)
-
View invoices and sales reports
-
Access client contact information
-
Add participants to classes
-
Merge client accounts
-
Edit the microsite
-
Edit forms
-
Modify memberships (dates, status, type)
-
View or edit admin/hidden form questions
-
Manage staff availability and schedules
💡 Tip: Grant only the permissions a user needs to perform their role. This helps reduce errors and protects sensitive data.
Special Permissions: Cancellations & Refunds
Some financial actions require additional permissions, even within certain roles.
Cancellations and refunds require specific permissions assigned to Administrators and Attendants. Account Owners always have this permission.
Best practices
-
Use permission levels to define the user’s general role.
-
Use granular permissions to make exceptions or fine adjustments.
-
Avoid granting financial or administrative permissions unless necessary.
-
Review permissions periodically, especially when a staff member’s responsibilities change.
If you have any questions about granular permissions or need help configuring access, contact our support team at support@activitymessenger.com.
Updating a User’s Information
Administrators and Account Owners can:
-
Update a user’s name or permission level
-
Modify granular permissions
-
Resend invitation emails
-
Revoke access
To update a user, open their profile from the Users table by clicking the user’s row, then select the appropriate action.
Email Invitation Not Received
If a user does not receive their invitation:
- Check the spam/junk folder. If found, ask the user to mark it as “Not Junk.”
- If not in spam, the email may be blocked by the provider. Ask the user to add activitymessenger.com and your Organization’s domain (if applicable) to their allowed senders list.
Provider-specific instructions:
-
Hotmail / Outlook: Settings → Junk Email → Allowed senders and domains
-
Gmail: Open the email → Select the three-dot menu (More) in the top-right corner → Add to Contacts or Mark as important
-
Bell / Sympatico: Settings → Security → Blocked senders/domains
-
Yahoo Mail: Add the sender’s email address to your contacts
-
Other providers: Search online for instructions on adding allowed senders or domains
Removing Access
To remove a user’s access:
- Open the user’s profile.
- Click Revoke.
The user will no longer access your Organization, but their account can still access other Organizations they belong to.
Sending Messages to Users
You can send email or SMS messages to staff users from Communications.
Use this when you need to contact instructors, attendants, administrators, or other staff members.
- Create a new message (Communications > + New message)
- Select Users to choose recipients.
- Optionally, BCC staff on messages sent to customers.
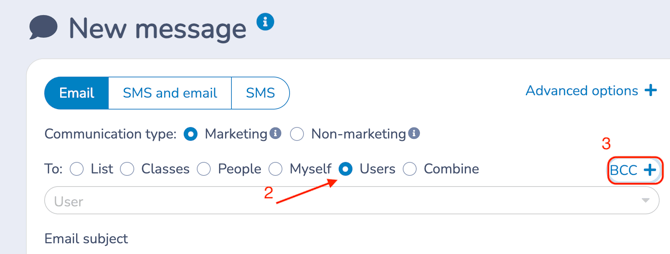
Generating a dashboard instructor message
You can generate a dashboard instructor message as a quick way to communicate with instructors without sending a full email or SMS message. All instructors will see your message.
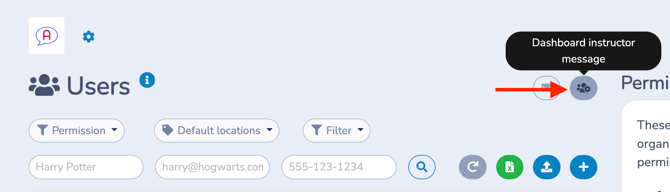
To do this:
- Click the user cog icon at the top right.
- Configure your message.
- Save or publish the message.
This is useful for short operational updates such as:
- Reminders for instructors
- Internal announcements
- Attendance instructions
- Schedule notes
- Policy reminders
- Important updates before a session, class, camp, or event
A dashboard instructor message is different from sending a message through Communications. It is intended as a quick internal communication method for instructors using the platform.
Use Communications > + New message when you need to send an email or SMS.
Use a dashboard instructor message when you want instructors to see an internal note in their dashboard without sending a separate message.
User Attribution Decision Guide
| If the user needs to... | Choose... |
|---|---|
| Manage everything, including billing and Organization settings | Account Owner |
| Manage operations and some users, but not billing | Administrator |
| Work at the front desk or POS | Attendant |
| Send campaigns, SMS, or templates | Communications Agent |
| Track attendance and manage assigned courses | Instructor |
| Track attendance but not send messages | Instructor without messaging |
| Review invoices and financial reports | Accountant |
| Receive messages as BCC without platform access | Guest |
Importing Users from Amilia
Use this section only if your Organization uses Amilia and needs to import staff members as Activity Messenger users.
If your Organization uses Amilia, you can import staff members as Activity Messenger users:
- Go to Staff > Users.
- Click the (+) Add User button.
- Select the Import from Amilia tab.
Each imported user will receive an email invitation to activate their account.
Related Guides:
- Getting Started in Activity Messenger- Identity & Branding Setup
- Payment & Financial Configuration
- Understanding the Billing Page
- Organization-Wide Advanced Settings
- Messaging Defaults
- Connected Apps