

Organization Settings
Use the links below to jump to the setup area you need.
- Identity & Branding
- Payment & Financial Configuration
- Understanding the Billing Page
- Users & Permissions
- Organization-Wide Advanced Settings
- Messaging Defaults
- Connected Apps
This article walks you through the payment and financial configuration options available in Activity Messenger. These settings define how money moves through the platform—from checkout to invoicing to reporting—and apply consistently across all sales channels.
Proper configuration ensures accurate invoices, reliable payment workflows, compliant tax handling, and clean financial reporting for both online and in-person transactions.
Invoicing and payment consistency
Activity Messenger uses a single, centralized invoicing engine across the entire platform. Invoices can be created from:
-
Admin-created invoices (manual invoicing)
-
Payment and registration forms
-
Booking reservations
-
Online stores via microsite pages
-
Point of Sale (POS)
All invoice creation methods feed into the same financial system, allowing you to accept and track:
-
Credit cards (via Stripe)
-
Interac e-Transfer
-
Cash
-
Other configured payment methods
This unified approach ensures consistent tax application, centralized reporting, and a complete financial picture—regardless of how or where a sale occurs.
This article will guide you through configuring each payment method and financial component you plan to use in Activity Messenger.
Best practices
- Configure Stripe before enabling online payments
- Clearly document Interac instructions for clients
- Set up taxes and ledger codes before creating products or classes
- Use ledger codes consistently
- Review POS permissions to ensure appropriate staff access
Open Payment & Financial Configuration settings
From the top navigation bar:
1. Click the cogwheel beside your Organization name.
2. Select Modify Organization Settings.
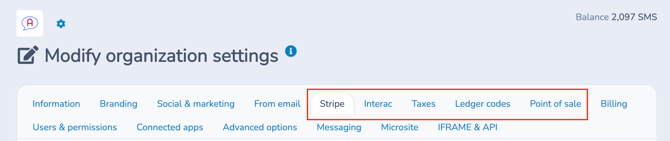
Covered in this Guide:
- Stripe (online credit card payments)
- Interac e-Transfer
- Taxes
- Ledger codes
- Point of Sale (POS)
1. Stripe
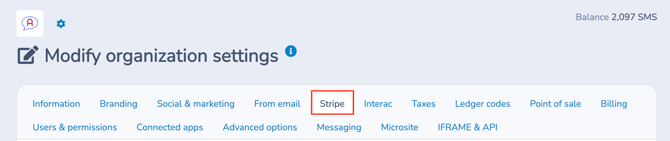
Stripe is the payment processor used to accept online credit card payments in Activity Messenger. Once connected, Stripe allows clients to pay securely through forms, invoices, online stores, and staff-assisted checkout flows.
For Canadian organizations, Stripe can also support direct bank transfers, depending on your Stripe account configuration.
Section Outline
Click a title to jump to that section.
A. What you can do with Stripe
B. Connecting your Stripe account
C. Jurisdiction & currency
D. Allow credit card payments on invoice balance pages
E. Bank transfers in Canada (optional)
F. Credit card convenience fee (optional)
G. Email templates (Stripe-related)
H. Failed payments daily digest
I. Stripe Terminal readers (advanced)
A. What you can do with Stripe
Using Stripe in Activity Messenger allows you to:
-
Accept online credit card payments
-
Automatically charge invoices and registrations
-
Record payments in real time for reporting and reconciliation
-
Use the same payment method across forms, invoices, POS, and microsites
All Stripe transactions flow into Activity Messenger’s centralized invoicing engine, ensuring consistent tracking and reporting.
Stripe fees (Standard)
Stripe uses simple, pay-as-you-go pricing with no setup fees or monthly charges.
Stripe charges:
2.9% + $0.30
per successful transaction for domestic credit cards
Stripe fees are charged directly by Stripe and appear in your Stripe account. These fees are separate from any Activity Messenger transaction or convenience fees you may configure.
Fees may vary by country, card type, and Stripe account configuration. Refer to your Stripe dashboard for exact rates. For more information, visit Stripe's website.
Payment behavior
Stripe payments in Activity Messenger behave as follows:
-
Payments are processed in real time
-
Successful payments are automatically recorded on invoices
-
Failed payments are logged and visible in payment history and reports
💡 Tip: Stripe configuration affects all online payment flows in Activity Messenger—including forms, invoices, microsite store, and Point of Sale transactions. Always review changes carefully before saving.
B. Connecting your Stripe account
To connect Stripe:
-
Go to
 Organization settings > Stripe
 -
Click Create/connect Stripe account
-
Sign in to an existing Stripe account or create a new one
-
Complete Stripe’s onboarding steps
Once connected, Stripe becomes available as a payment method across the entire platform.
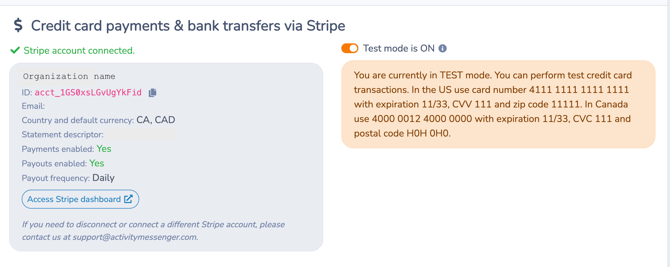
Stripe Account Details
Once Stripe is connected, this panel displays the current Stripe account linked to your Activity Messenger organization, along with its operational status.
This section provides a quick, read-only overview of your Stripe configuration
⚠️ Important
If you need to disconnect your current Stripe account or connect a different one, please contact Activity Messenger Support at support@activitymessenger.com.
Test mode
By default, Stripe is connected in Test mode.
Test mode allows you to fully simulate credit card transactions and validate your payment workflows without processing real payments.
Use Test mode to:
-
Test payment forms
-
Validate invoice payments
-
Verify POS and checkout behavior
Test mode can be toggled on or off directly from the Stripe configuration screen once onboarding is complete.
⚠️ Important: Before publishing payment forms or accepting real payments, you must disable Test mode in Stripe.
📎 For a step-by-step guide on building and launching payment forms, refer to [Create Your First Payment Form].
C. Jurisdiction & currency
After connecting Stripe, Activity Messenger automatically pulls in the jurisdiction information defined during account creation in the Billing section. You can update this setting here if adjustments are needed.
You can also select the currency used for Stripe transactions (for example, CAD or USD).
D. Allow credit card payments on invoice balance pages
This setting controls whether clients are allowed to pay outstanding invoice balances by credit card.
Note: This option applies only to invoices with an outstanding balance that are sent to clients after the initial invoice creation. It does not affect the payment methods configured directly on forms, booking packages, or checkout flows.
When enabled:
-
Clients can pay unpaid invoice balances by credit card directly from the invoice
-
This applies primarily to invoices created and sent manually
E. Bank transfers in Canada (optional)
Bank transfers via Stripe are separate from Interac e-Transfer and follow different settlement timelines and workflows.
For Canadian organizations, Stripe can support bank transfers (pre-authorized debit) as an alternative to credit cards.
-
This feature requires additional setup
-
Clients authorize debits directly from their bank account
-
Settlement can take up to 5 business days
For more information, visit Stripe's Pre-authorized debit payments in Canada article.
📩 To enable this feature, contact support@activitymessenger.com.
F. Credit card convenience fee (optional)
You can configure a credit card convenience fee that is applied when a client pays online by credit card.
When enabled:
-
A separate invoice line item is automatically added
-
You can define:
-
The label (for example, Credit card convenience fee)
-
The percentage to apply
-
Applicable taxes
-
An associated ledger code
-
Important behavior notes
By default, this fee applies to:
-
The Microsite store
-
Invoices created and sent manually
To apply a convenience fee on payment forms, it must also be explicitly enabled in the Payment Options of each individual form.
This approach gives you flexibility to recover credit card processing costs while maintaining clear pricing and transparency for clients.
⚠️ Important legal note
Be sure to verify the regulations in your jurisdiction. Charging a credit card convenience fee is not permitted in certain regions, including Quebec.
G. Email templates (Stripe-related)
Stripe-related payment events use dedicated email templates that you can customize, including:
-
Payment confirmation
-
Scheduled payment – credit card error
These templates ensure clients are notified of successful payments or issues requiring follow-up, and can be tailored to match your organization’s tone and branding.
H. Failed payments daily digest
To help monitor failed credit card payments, you can assign one or more users to receive the Failed payments daily digest. Assigning at least one user here is strongly recommended to avoid missed revenue due to failed automatic payments.
To assign a user, simply choose from the available users in the dropdown menu.
Refer to the Users & Permissions article for step-by-step instructions on how to add and manage users in your Activity Messenger organization.
When configured:
-
A daily summary email is sent around 9:30 AM Eastern Time
-
The email lists all automatic Stripe payments that failed the previous day
-
This allows staff to proactively follow up with clients
💡 Important:
When you select a user here, that user is automatically added everywhere Activity Messenger provides an option to assign recipients for failed payment notifications (e.g., on the Interac configuration panel).
I. Stripe Terminal readers (advanced)
Stripe Terminal allows you to accept in-person debit and credit card payments using compatible Stripe card readers, while keeping all transactions fully integrated with Activity Messenger’s invoicing, POS, and reporting systems.
This feature is intended for front desks, on-site events, and staff-assisted transactions where payments are taken physically rather than online.
Note: If you plan to use a Stripe Terminal reader, make sure to configure your Point of Sale (POS) settings in the dedicated section below. This ensures in-person payments are processed correctly and fully integrated with your invoicing and reporting workflows.
Supported terminal readers
Activity Messenger currently supports Stripe Terminal readers such as:
Terminal readers must be purchased directly from Stripe and linked to your Stripe account.
Locations
Before using terminal readers, you must define at least one physical location.
-
Each terminal reader is assigned to a specific location
-
Locations typically represent front desks, offices, or physical venues
-
Locations are synced with Stripe and used to properly route in-person payments
You can add, edit, or remove locations directly from this section.
Readers management
Once a device is connected to your Stripe account:
-
All terminal readers linked to your Stripe account appear in the Readers list
-
Each reader displays:
-
Name
-
Assigned location
-
Stripe reader ID
-
Device type
-
Online / Offline status
-
Offline readers cannot process payments until they reconnect to the network.
Tipping options (optional)
You can enable tipping prompts for in-person payments processed through Stripe Terminal.
When enabled:
-
Clients are presented with predefined tip options (for example: 10%, 15%, 20%)
-
Tips are collected as part of the same transaction
-
Tip amounts are recorded and reported through Stripe and Activity Messenger
Tip configuration applies only to terminal-based payments and does not affect online payments.
Reader splash screen
You can customize the splash screen displayed on your Stripe Terminal readers. The splash screen is the background image shown on the device when it is idle and behind on-screen buttons during transactions.
Important notes:
-
Changes may take several minutes to appear on the physical reader.
-
This feature is useful for reinforcing your branding or confirming that the reader is connected to the correct organization.
Customizing the splash screen helps provide a more consistent, professional in-person payment experience.
Administrator payment controls
Additional controls are available for administrative workflows:
-
Show Stripe Terminal on the payment page for administrators
Allows admins to select Stripe Terminal as a payment method when processing payments. -
Do not allow payments using other payment terminals
Restricts payments to Stripe Terminal only, hiding other card or debit terminals from available options.
These options are useful for enforcing standardized in-person payment workflows.
Important notes
-
Stripe Terminal payments use the same invoicing engine as online payments
-
Taxes, ledger codes, and reporting behave consistently across all payment channels
-
Terminal readers are subject to Stripe availability and regional support
2. Interac e-Transfer (Canada only)
Interac e-Transfer allows you to offer clients a cost-effective alternative to credit card payments while benefiting from fast, often same-day bank deposits. Activity Messenger supports both manual and automated reconciliation of Interac payments, making it a practical option for organizations that want to reduce processing fees without sacrificing tracking, reporting, or invoice visibility.
Interac e-Transfer is available only in Canada.
For more information about the service itself, visit the Interac website.
⚠️ If you are operating in Canada and do not see the Interac tab, verify that your Jurisdiction is set to a Canadian province on the Billing page. Interac options are displayed only when the organization’s jurisdiction is configured accordingly.
Scope of this section
This section focuses on the initial configuration of Interac e-Transfer within Activity Messenger—enabling the payment method, defining instructions, and activating automation options.
➡️ For a complete walkthrough of Interac e-Transfer workflows—including the client experience, payment follow-up, settlement options, and full automation—refer to the dedicated Interac e-Transfer article.
Section Outline
Click a title to jump to that section.
A. Why use Interac e-Transfer?
B. Configuring Interac e-Transfer
C. Enable Interac Auto-Deposit (Recommended)
D. Security Question & Answer Settings
E. Interac payment settlement behavior
F. Automatic cancellation (optional)
G. Payment settlement (Manual vs Automatic Reconciliation)
• Configuring Automatic Reconciliation (Recommended)
• How automatic reconciliation works
• Interac automatic reconciliation fees
H. Failed payments daily digest
A. Why use Interac e-Transfer?
Using Interac e-Transfer allows you to:
- Reduce credit card processing fees
- Receive funds directly into your bank account, often the same day
- Offer a familiar and trusted payment method to Canadian clients
- Automate invoice reconciliation when properly configured
When enabled, Interac e-Transfer integrates seamlessly with Activity Messenger’s invoicing and registration workflows.
B. Configuring Interac e-Transfer
To enable Interac e-Transfer:
- Open
 Organization Settings > Interac
 - Enter the email address where clients will send Interac transfers
- Click Save
Once saved, Interac e-Transfer becomes available as a payment option in payment forms and invoices.
C. Enable Interac Auto-Deposit (Recommended)
We strongly recommend enabling Interac Auto-Deposit for the configured email address through your bank.
When Auto-Deposit is enabled:
- Transfers are deposited automatically
- No security answer is required for settlement
- Manual intervention is reduced
- Payment reconciliation is faster and more reliable
Both you and the client receive confirmation once the transfer is accepted.
Once Auto-Deposit is enabled with your bank, return to this section and check the Auto-Deposit confirmation box to inform Activity Messenger that the setup is complete. This allows the platform to adjust settlement and automation behavior accordingly.
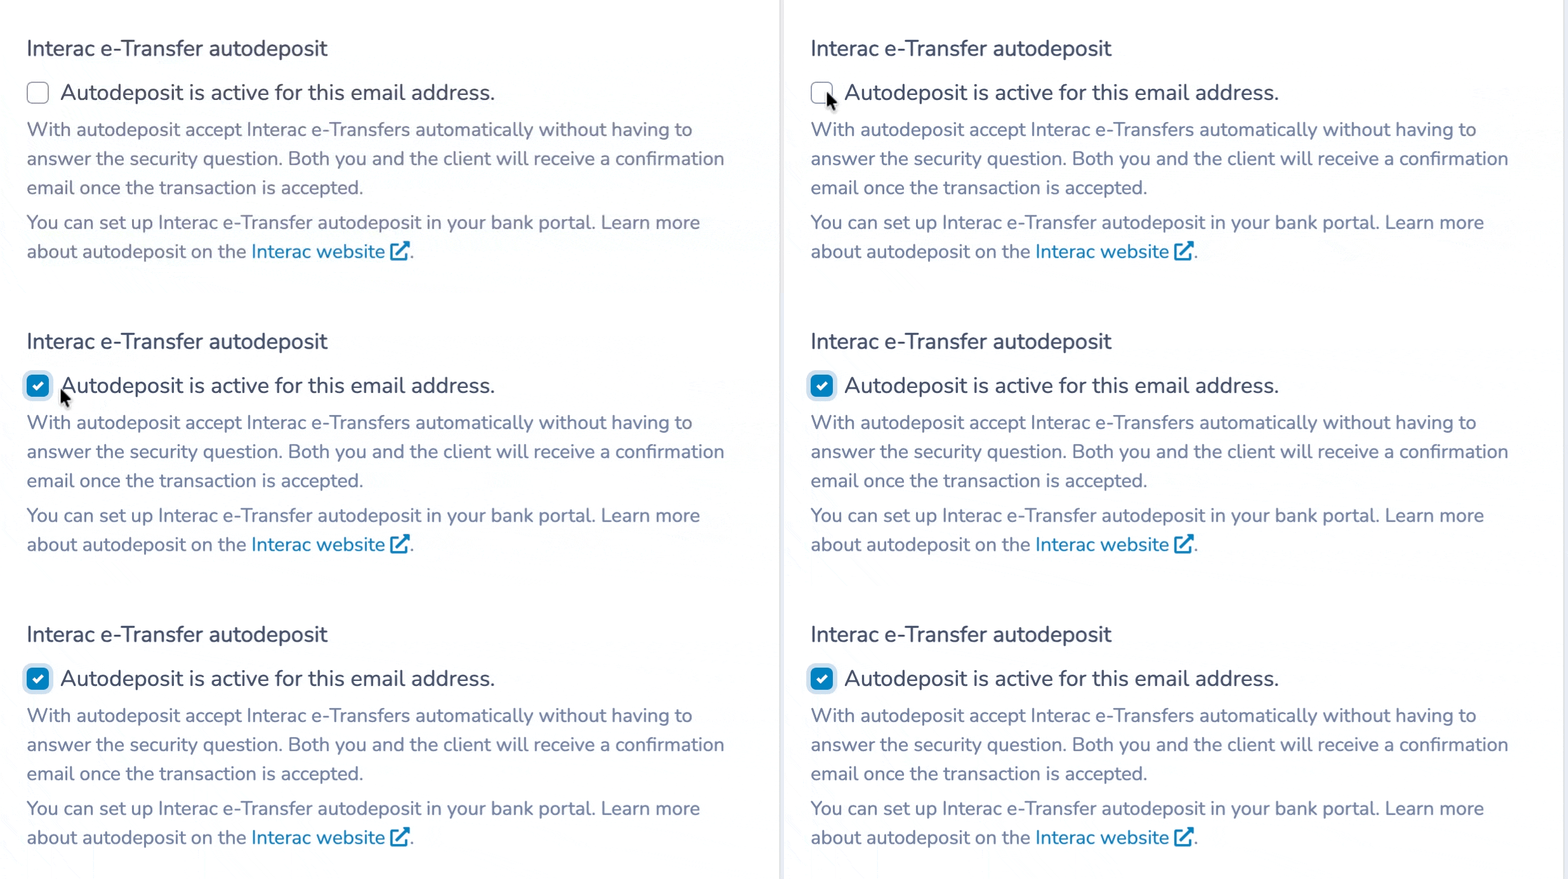
D. Security Question & Answer Settings
If you choose not to enable Interac Auto-Deposit with your bank, you must configure how the security question and answer are handled for Interac e-Transfers. These details are required by clients when sending a transfer from their banking app.
By default, Activity Messenger automatically generates a secure answer for each Interac payment, ensuring consistency and reducing client errors.
Optionally, you can allow clients to enter their own security answer instead. This behavior is controlled directly in the Interac configuration panel.
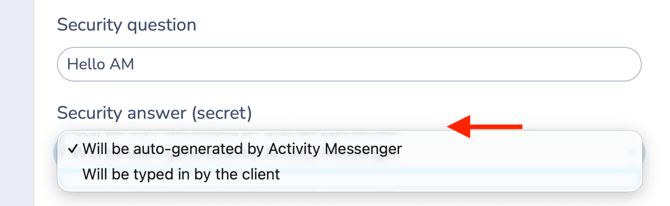
Note: Even when Auto-Deposit is enabled, some banking apps may still require clients to enter a security question and answer. Activity Messenger displays these values clearly and makes them easy for clients to copy and paste into their banking app.
E. Interac payment settlement behavior
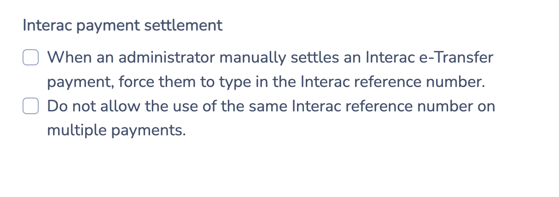 From this configuration screen, you can control how Interac payments are settled:
- Manual settlement option
When enabled, administrators must enter the Interac reference number when confirming payment. - Prevent duplicate reference numbers
Ensures the same Interac reference number cannot be used to settle multiple payments.
These controls help prevent reconciliation errors and duplicate settlements.
F. Automatic cancellation (optional)
You may enable automatic cancellation for unpaid Interac invoices.
⚠️ Important warning
Automatic cancellation is not recommended for most use cases.
We recommend enabling this feature only for highly contingent programs where:
-
Available spots are extremely limited, and
-
It is critical to quickly release a reserved spot if payment is not received within a short time frame
For most organizations and registration workflows, manual follow-up or automated reminders without cancellation provide a better client experience and reduce the risk of unintended cancellations.
Automatic cancellation is only available when both of the following conditions are met:
- Interac Auto-Deposit is enabled with your bank
- Automatic Reconciliation is configured, with Interac confirmation emails forwarded to interac@am.lol
Behavior when enabled:
-
A payment reminder email is sent if payment is not received within a configurable delay after registration
-
A final cancellation email is sent after a second configurable delay
-
The purchase or registration is automatically cancelled if payment remains outstanding
-
Optional SMS notifications can be sent to the client at each step
All reminder and cancellation emails:
-
Are fully customizable
-
Include a direct link to the invoice so clients can complete payment quickly
Note: Automatic cancellation applies only to new purchases. It does not cancel invoices where a client is attempting to pay an existing balance.
G. Payment Settlement
There are two ways to reconcile Interac e-Transfer payments on invoices in Activity Messenger: manual settlement and automatic reconciliation.
If Interac Auto-Deposit is not enabled for the configured email address, e-Transfers must first be manually accepted through your bank before they can be settled in Activity Messenger.
➡️ For a complete walkthrough of Interac e-Transfer workflows—including client experience, settlement options, and automation—refer to the dedicated Interac e-Transfer article.
Configuring Automatic Reconciliation (Recommended)
Activity Messenger offers automatic Interac e-Transfer reconciliation (for a processing fee—see below), allowing invoices to be marked as paid automatically as soon as Interac payments are received. This significantly reduces manual administration and helps keep your financial records up to date in real time.
We strongly recommend enabling automatic reconciliation if you plan to accept Interac e-Transfers regularly.
How automatic reconciliation works
To enable automatic reconciliation, forward the Interac confirmation emails sent by your bank to:
interac@am.lol
When Activity Messenger receives the confirmation email, it will:
-
-
Read the encrypted invoice ID included in the Interac transfer message
-
Automatically match the payment to the correct invoice
-
Mark the invoice as paid in Activity Messenger
-
In most cases, invoices are settled within minutes of payment.
💡 Tip: You can create an automatic forwarding rule in your email client (such as Gmail or Outlook) so that all Interac confirmation emails are forwarded to interac@am.lol without manual intervention. This allows reconciliation to remain fully automated—even if Interac Auto-Deposit is not enabled.
📎 For step-by-step instructions, refer to the Email Forwarding Guide (Gmail & Outlook).
Interac Automatic reconciliation fees
Activity Messenger applies a 1% processing fee on Interac e-Transfer payments:
-
Minimum fee: $0.50
-
Maximum fee: $5.00
-
Plus applicable sales taxes
This fee is added to your monthly subscription invoice.
For details, refer to the Billing section.
H. Failed payments daily digest
The users selected here are shared with the Stripe failed payments daily digest configured earlier in this article. Any user added to receive failed payment notifications will receive digests for both Stripe and Interac e-Transfer, where applicable.
For more details on how failed payment notifications work and how users are assigned, refer to the Stripe – Failed Payments Daily Digest section above.
3. Taxes
The Taxes tab allows you to define and manage tax rates applied to payments and invoices in Activity Messenger.
Configuring taxes at the organization level ensures tax rules can be applied consistently across all sellable items—such as classes, products, bookings, and invoice items—resulting in accurate calculations, compliant invoicing, and simplified reporting.
Creating a new tax
To add a tax rate:
- Click the + button
- Configure the following fields:
- Name — Label displayed to customers (e.g. GST, QST, Sales Tax)
- Description — Internal reference for administrators
- Tax percentage — Rate applied to taxable items
- Inclusive tax (optional) — Enable if prices already include this tax
When Inclusive tax is enabled, Activity Messenger calculates and displays the tax portion without increasing the final price shown to the customer.
Managing taxes
- All configured taxes appear in a centralized list
- Use the drag handle (three horizontal lines) to reorder taxes and control their display order on invoices
Once created, taxes can be applied to:
- Classes and events
- Products
- Booking packages
- Invoice items and payment blocks
4. Ledger Codes
Ledger codes are used to categorize revenue for accounting and financial reporting. They help structure your financial data, making it easier to generate meaningful reports, reconcile revenue, and export data to external accounting systems.
When used consistently, ledger codes clearly identify what is selling on the platform and how revenue is distributed across programs, departments, or activities.
Where ledger codes are used
Ledger codes can be assigned to all sellable objects in Activity Messenger, including:
- Classes and events
- Products
- Booking packages
- Invoice items and additional fees
- Other e-commerce blocks
Assigning ledger codes at configuration time ensures revenue is classified correctly at the point of sale.
Creating and managing ledger codes
To create a ledger code:
- Go to Ledger Codes
- Click the + button
- Define a code and label aligned with your accounting structure
Once created, ledger codes become available wherever sellable items are configured. They can be edited or reordered at any time as your accounting needs evolve.
Why use ledger codes
Ledger codes allow you to:
- Segment revenue by program, department, or activity
- Generate cleaner financial exports
- Simplify reconciliation with accounting software
- Support detailed financial reporting and audits
5. Point of Sale (POS)
The Point of Sale (POS) tab allows you to configure in-person and staff-assisted sales workflows within Activity Messenger. This setup is intended for front desks, kiosks, and on-site transactions where staff process payments on behalf of clients.
The POS uses the same invoicing engine, payment methods, and financial rules as online forms, ensuring consistency across all sales channels.
Cash register management
When enabled, staff members must open and close their cash register daily.
- Transactions cannot be completed unless the register is opened
- Cash register activity is tracked via E-Commerce > Invoices
- Administrators can review daily activity using the Cash register report, including:
- Openings and closings
- Cash movement
- Transaction consistency
This is especially useful for organizations handling cash or requiring daily reconciliation.
Microsite online store
Attendants can pay a booking package later
By default, when an attendant registers a client for a booking package, payment must be completed immediately during checkout.
When this option is enabled, attendants can complete the reservation without collecting payment at the time of registration. The booking is confirmed, and the client can pay the outstanding balance later through their invoice or account.
This is useful for:
-
Front-desk or staff-assisted registrations
-
Situations where payment is collected after approval or verification
Attendants can pay a product later
By default, when an attendant purchases a product on behalf of a client in the Microsite Store, payment must be taken at checkout.
When enabled, attendants can complete the product purchase without processing payment. The product is issued to the client, and payment can be completed later.
This is commonly used for:
-
Staff-assisted sales
-
Deferred payments or internal billing workflows
💡 Note: In both cases, unpaid purchases generate an invoice that can be settled later using the organization’s configured payment methods.
Receipt printer configuration
The POS supports printing invoices and receipts using a thermal receipt printer.
Available options include:
- Use a receipt printer
- Enables printing invoices directly from Activity Messenger
- Displays a Print button on invoices
- Requires a USB-connected thermal printer
- The Rongta RP326 model is recommended
- Open cash drawer when receipt is printed
- Automatically opens the cash drawer
- Requires a compatible printer and cash drawer
Built-in tools allow you to:
- View printer setup Instructions
- Test your printer before going live
Why use the Point of Sale
Using the POS allows you to:
- Process walk-in registrations using the same rules as online forms
- Maintain consistent invoicing and tax calculations
- Track staff-assisted and online sales together
- Support cash handling with daily reconciliation
- Print receipts and manage cash drawers efficiently
➡️ For detailed setup instructions, see Setting Up Your Point of Sale (POS) (article coming soon).
If you need immediate assistance, contact support@activitymessenger.com.
Related articles
- Organization Payment Configurations (E-Commerce 101)
- Setting Up Your Point of Sale (POS)