

Organization Settings
Use the links below to jump to the setup area you need.
- Payment & Financial Configuration
- Understanding the Billing Page
- Users & Permissions
- Organization-Wide Advanced Settings
- Messaging Defaults
- Connected Apps
-
Microsite Configuration & IFRAME Integration
Activity Messenger allows you to create a Microsite—a lightweight, customizable mini-website where you can host content, forms, schedules, products, and videos without building a full website.
The Microsite and IFRAME features allow you to deliver fully branded, responsive client and staff experiences—either as a standalone mini-site or seamlessly embedded into your existing website.
This article focuses specifically on configuring the display and functional settings that control how your Microsite behaves, appears, and interacts with clients and staff.
Use this guide as a reference for Organization-level Microsite and IFRAME configuration settings. For the full workflow of building pages, setting up the store, managing the client account portal, or publishing the Microsite, see the Microsite Overview guide.
Open Microsite & IFRAME settings
From the top navigation bar:
-
Click the cogwheel beside your Organization name.
-
Select Modify Organization Settings.
- Select the desired tab:
- Microsite
- IFRAME & API

Covered in this guide
Use this section to quickly find the Microsite or IFRAME setting you need.
-
Microsite Settings
I. Search Engine Visibility
II. Side Navigation Menu
III. Checkout & Online Store Configuration -
IFRAME & API
I. Embedding Your Microsite
II. IFRAME Display Behavior
III. API Key
1. Microsite Settings
All settings in this section apply organization-wide to your Microsite.
Be sure to click Save at the bottom of the page to apply any changes.
I. Search Engine Visibility
Prevent search bots from crawling your Microsite
When enabled:
-
Search engines (such as Google or Bing) are instructed not to index your Microsite
-
Your Microsite will not appear in public search results
This setting is recommended for:
-
Private or invitation-only portals
-
Internal staff or volunteer portals
-
Temporary or test Microsites
II. Side Navigation Menu Configuration
A. Portal Navigation Links
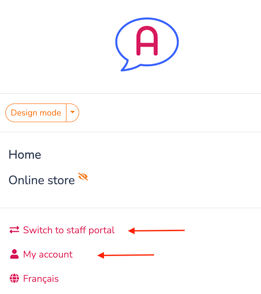
Show staff portal link on client portal
-
Displays a link that allows staff to switch from the Client portal to the Staff portal
Show “My Account” link in the Microsite
-
Adds a visible My Account link for clients
-
Allows clients to access their profile, registrations, invoices, and memberships more easily
B. Terms and Conditions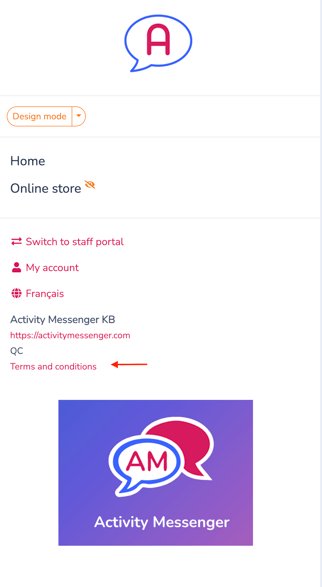
You can define Terms and Conditions that are displayed within your Microsite:
-
Separate content for English and French
-
Editable directly from this section
-
Accessible from the Microsite’s side navigation menu
This is typically used to present your organization’s general terms for clients interacting with the Microsite.
C. Navigation Secondary Logo
-
Displays a logo in the footer of the Microsite’s side navigation menu
-
Appears underneath the Terms and Conditions link
This logo is optional and independent from your main branding logo.
Common use cases include:
-
Sub-brands
-
Sponsors
-
Programs within a larger organization
III. Checkout & Online Store Configuration
A. Checkout Cart Time to Live (5–30 minutes)
Defines how long items remain reserved in a client’s checkout cart.
-
Applies to bookings and products purchased through the Microsite
-
Once the timer expires, items are released back into availability
This helps prevent inventory from being held indefinitely.
B. Products Visible to Clients
Controls which products appear in the Online Store using product tags.
-
Only products with matching tags will be shown
-
Tags are applied directly on Products
This allows you to curate what clients see in your online store.
C. Products Visible to Administrators
Controls which products are visible internally to administrators, also using tags.
This is useful for:
-
Segmenting products by audience
-
Hiding internal or staff-only items
-
Simplifying the client shopping experience
D. Message Displayed When a Membership Is Required
Displayed when a client attempts to purchase an item that requires a membership.
-
Configurable separately for English and French
-
Fully editable text
Common use cases:
-
Member-only registrations
-
Private programs or gated products
E. Test Mode Email Override
When configured:
-
Client emails (purchase confirmations, cancellations, invoices) are not sent to clients
-
Emails are instead sent to the specified internal email address
This is useful for:
-
Testing checkout and payment flows
-
Reviewing invoice and confirmation emails before launch
⚠️ Important: Be sure to remove or clear this setting before launching your Microsite publicly.
2. IFRAME & API
I. Embedding Your Microsite Using an IFRAME
You can embed your Activity Messenger Microsite directly into your existing website using an IFRAME.
To embed the Microsite, follow the on-screen instructions provided in the IFRAME & API section. The generated embed code can be added to any page on your website.
Responsive behavior
The embedded Microsite is fully responsive:
-
Automatically adjusts its width and height
-
Does not use internal scrollbars
-
Expands to fit the container defined by your website layout
💡 Recommendation: Ensure your website layout is also responsive to provide an optimal mobile experience.
II. IFRAME Display Behavior
You can control how the Microsite appears when embedded via IFRAME.
By default, an embedded Microsite does not display:
-
The sidebar navigation menu
-
Breadcrumbs (top navigation)
These elements can be enabled if you want the embedded experience to mirror the standalone Microsite.
Hide logo in IFRAME
When enabled, the Microsite logo is hidden inside the IFRAME.
This option is typically used when the sidebar navigation is shown on your website, preventing your organization’s logo from appearing twice on the same page.
Background color
You can customize the background color used for the embedded Microsite, including setting it to transparent, to better match your website’s design.
Note: Button colors are inherited from your Branding settings.
III. API Key
The API key allows your organization to:
-
Authenticate requests made to Activity Messenger’s API
-
Securely exchange data between Activity Messenger and external systems
-
Support advanced integrations, automation, and custom development use cases
⚠️ Important: Treat API keys as sensitive credentials. Do not share them publicly or place them in client-side code.
➡️ For full details on API capabilities and usage, refer to the dedicated API Documentation article.
3. Best Practices
-
Use search bot blocking for private or internal Microsites
-
Set appropriate checkout time limits for limited-capacity offerings
-
Test checkout flows using Test mode before launch
-
Use tag-based product visibility to simplify client navigation
-
Ensure POS and payment settings are configured before enabling sales
Related guides
-
Getting Started in Activity Messenger
-
Identity & Branding Setup
-
Payment & Financial Configuration
-
Connected Apps: Using Third Party Tools with Activity Messenger
-
Forms 101: Getting Started with Activity Messenger Forms
-
Class/Event creation guide
-
Media Library: Managing and Reusing Images, Videos, and Documents
-
API Documentation