

Organization Settings
Use the links below to jump to the setup area you need.
- Identity & Branding
- Payment & Financial Configuration
- Understanding the Billing Page
- Users & Permissions
- Organization-Wide Advanced Settings
- Messaging Defaults
- Connected Apps
This article covers the Identity & Branding configuration steps that establish your organization’s presence in Activity Messenger.
These settings are the first configuration steps you should complete, as they define how your organization is identified, presented, and contacted across the entire platform. From forms and emails to invoices, SMS messages, and microsites, everything in Activity Messenger relies on the information and branding configured here.
Accurate configuration of this section is essential for branding consistency, legal compliance, and proper message delivery.
Open Identity & Branding settings
From the top navigation bar:
1. Click the cogwheel beside your Organization name.
2. Select Modify Organization Settings.

Covered in this guide
1. Information
The Information tab defines your organization’s core identity and default contact details within Activity Messenger.
The settings configured here are reused across the platform and are critical for branding consistency, legal compliance, and reliable message delivery.
Available settings
Organization name
The official name of your organization.
Appears in all client-facing communications, including emails, invoices, and confirmation messages.
Alias
A shortened version of your organization name used in SMS messages.
Maximum length: 20 characters.
Language
Sets the default language of your organization in Activity Messenger.
Supported languages: English and French.
Website URL
The link associated with your logo in email headers and messages.
⚠️ Required by electronic messaging regulations in Canada and the United States.
Address
Your organization’s physical or mailing address.
⚠️ Displayed in the footer of all emails and legally required under Canadian and U.S. electronic messaging laws.
Note
For a full breakdown of messaging laws in Canada and the United States—and how Activity Messenger complies—refer to Personal Information and Electronic Message Laws in Canada and the USA.
Telephone (optional)
A contact phone number displayed in email footers.
Reply-to email
The default email address recipients reply to when responding to your messages.
This can be overridden when sending individual messages.
Timezone
Defines the timezone in which your organization operates.
Affects scheduling, timestamps, automations, and time-based reporting across the platform.
Category (optional)
Used to tailor which sample blocks and templates are suggested when creating new forms.
Selecting a category helps surface more relevant examples based on your organization type.
Important notes
- Changes made in this section affect all new and existing assets that rely on organization information.
- Always click Update to save your changes.
- This section forms the foundation of your Activity Messenger account and should be one of the first areas configured when setting up a new organization.
2. Branding
The Branding tab controls how your organization visually appears to respondents across forms, emails, invoices, and microsites.
These settings ensure a consistent, professional, and on-brand experience from your website through every interaction in Activity Messenger.
Note: The email preview displayed on the left side of this screen is a live preview and updates in real time as you make changes.
Logos and visual identity
- Upload your standard logo and full-width logo
- Logos appear in:
- Form headers
- Confirmation pages
- Emails
- Invoices
- Logos can be previewed, replaced, or removed at any time
Brand colors
- Define the primary button color used across forms and emails
- Add additional brand colors for use in message templates
- Adjust button border radius to match your brand guidelines
(Higher values create more rounded buttons)
Form styling and advanced customization
Background image and CSS of forms
Customize the background and apply custom CSS to all forms.
These settings define the visual backdrop used when forms are viewed on larger screens (desktop or tablet).
- If not configured, Activity Messenger applies a default dark-blue background on larger screens.
Microsite CSS (advanced)
Apply custom CSS to Microsite pages for deeper control over layout and presentation.
Footer
Edit the styling of the footer displayed on forms and emails, including colors and text formatting.
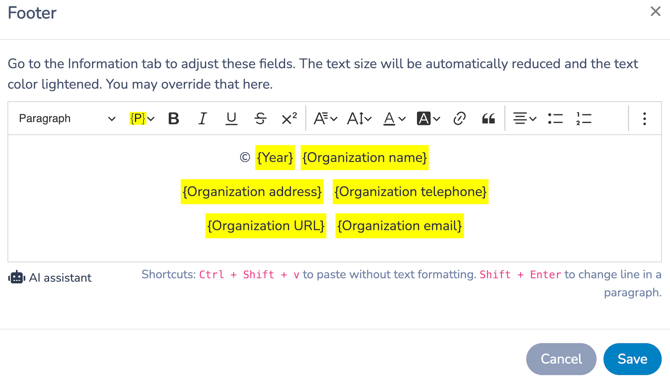
- By default, Activity Messenger generates footer content using placeholders that pull required information from the Information tab.
⚠️ Important: This section has legal implications. Certain information must appear in email footers to comply with messaging regulations.
Use this area to adjust styling only, not to remove or alter legally required content.
Important note
Changes made in this section affect all new and existing assets that rely on organization branding.
Always review updates carefully and click Update to save your changes.
3. Social & Integrations
The Social & Integrations tab connects Activity Messenger with external platforms and defines how your organization is represented across social channels and analytics tools.
These settings support discoverability, engagement tracking, and conversion measurement, especially for payment forms.
This section is divided into two areas: Social links and E-commerce & analytics integrations.
Social links
Add links to your organization’s social media profiles:
- X (Twitter)
- TikTok
- Vimeo
- YouTube
Configured social links automatically appear in:
- Email footers
- Landing pages and microsites
When Vimeo and YouTube accounts are connected, all public-facing videos become available in your Media collection, making them easy to reuse in forms and pages.
E-commerce & analytics integrations
Enable tracking and conversion measurement for forms—particularly payment forms.
Available integrations include:
- Facebook Pixel ID — Tracks conversions and campaign performance on Facebook and Instagram
- Google Ads (AdWords) ID and label — Enables conversion tracking for Google Ads
- Domain — Ensures proper attribution and tracking
- Google Analytics
- Universal Analytics (UA-XXXXXXX) — deprecated
- Google Analytics 4 (G-XXXXXXX) — recommended
Once configured, Activity Messenger automatically places tracking and conversion tags on payment forms, allowing you to measure views, submissions, and purchases directly in your analytics platforms.
Note: These integrations are configured at the organization level and apply to all relevant forms.
4. From Email
The From Email tab defines which email addresses are used as the sender for all outgoing emails sent from Activity Messenger.
Proper configuration is essential for deliverability, branding, and reliable reply handling.
Default behavior (not recommended)
If this section is not configured:
- The Reply-To email address is always that of your organization. However, email clients may sometimes reply to the From email address. Replies may therefore be sent to Activity Messenger instead of your organization.
-
In these cases, messages are manually forwarded to you
(usually within 24–48 hours, and longer on weekends)
While this setup typically works, it can result in delayed or missed replies.
➡️ Strongly recommended: Configure your own domain and professional email addresses.
Why configure your own From Email?
- Fully white-label outgoing emails
- Ensure replies go directly to your team
- Improve deliverability and spam protection
- Maintain trust and professionalism with recipients
Activity Messenger sends emails via Amazon Web Services (AWS) using industry-standard authentication.
From Email vs Reply-To
From Email
The sender address shown in message details.
Reply-To Email
Where replies are delivered when recipients click Reply.
When a verified From Email is used, the Reply-To address automatically matches it (unless explicitly overridden).
Two-step verification process
1. Verify your domain
You must publish DNS records (DKIM and SPF) to prove domain ownership.
Steps:
- Enter your root domain (e.g. yourdomain.com)
- Download the DNS records (1 TXT + 3 CNAME)
- Add them via your hosting provider
- Refresh the verification status in Activity Messenger
📎 See: How to Verify Your Website Domain
2. Verify each From Email address
Every sending address must be verified individually.
Steps:
- Enter the email address
- Click Verify
- Confirm the verification email sent by AWS
- Refresh the page
After verification
- Verified From Emails become selectable when sending messages
- Replies are delivered directly to your inbox
- Emails are sent on behalf of your domain
- Optional: Set a different Reply-To address if needed
Email authentication (high-level)
- DKIM — Digitally signs emails
- SPF — Authorizes Activity Messenger to send on your behalf
- DMARC — Defines how failed messages are handled
These mechanisms protect your domain and reduce spam risk.
Best practices
- Always send emails from your own domain
- Verify every From Email address you plan to use
- Double-check DNS records
- Click Update to save changes
Proper configuration of the From Email tab ensures reliable delivery, faster replies, and a fully branded communication experience across Activity Messenger.
5. Next Steps
Well done! You’ve completed the foundational setup required to get your organization up and running in Activity Messenger.
At this stage, your identity, branding, communications, and integrations are configured, allowing you to create forms, send messages, and engage with respondents confidently.
If you plan to accept payments through Activity Messenger, the next step is to configure your financial and payment settings.
➡️ Continue with Payment & Financial Configuration to set up payment providers, taxes, ledger codes, and invoicing behavior.
This will ensure your organization is fully prepared to collect payments securely and manage financial workflows end to end.