

Automatically send one or more email or SMS messages after someone submits a form.
The Form Response automation is action-based and is triggered by a submission event. After the form is submitted, you define when the message should send, either immediately or relative to a selected date field within the form.
This automation is ideal for confirmations, follow-ups, onboarding sequences, and structured nurture campaigns tied directly to user actions.
Instead of manually tracking responses and sending emails one by one, you define the rule once and the system applies it automatically to every qualifying submission.
📌 At a Glance
Form Response automation automatically sends an email or SMS after a form submission, with timing based on the submission date or a selected date field within the form.
Definition
Form Response is an action-based automation triggered when a form is submitted.
Use it when
You want to:
• send confirmation messages after submission
• follow up with respondents automatically
• run onboarding or drip campaigns
• send reminders tied to a form date field
Inputs
• form submission event
• selected date field (submission date or form date field)
• optional filters based on form answers
Outputs
• scheduled email or SMS messages
• follow-up sequences created by multiple automations
Key rules
• One automation sends one message
• Timing is calculated per form response
• Additional messages require additional automations
• Filters determine which respondents receive the message
Related features
Forms • Templates • Quick Messages • Lists • Automations
Covered in this guide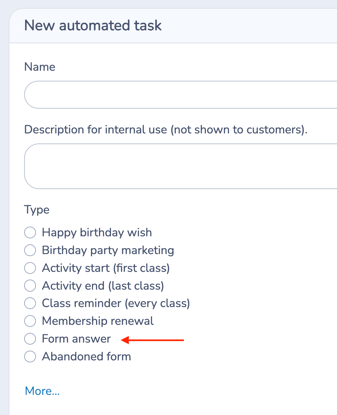
Use this section to quickly find the Form Response setting or workflow you need.
1. When to use Form Response Automation
-
Confirmation emails after registration
-
Lead nurturing campaigns
-
Free trial follow-ups
-
Evaluation follow-ups
-
Survey acknowledgments
-
Multi-step onboarding sequences
2. 🧭 How Form Response works
This automation is triggered by a form submission event. You then choose which date field the timing should reference.
Each automation sends one message at a defined interval.
You can choose to send:
-
An immediate message (Right after response), or
-
A message before or after the selected date field
If you need multiple follow-up messages, create additional automations using the same form trigger.
Think of it as a rule that starts when a form is submitted and sends one message based on the timing you configure.
⚙️ Form Response Execution Model
Form Response automations follow this sequence:
Trigger
The automation activates when the selected form is submitted.
Timing reference
Timing is calculated using:
-
the submission date, or
-
a date field selected in the form
Filters
Optional filters evaluate form answers and registration conditions.
Scheduling
If conditions are met, the system schedules the message according to the configured delay.
3. Step-by-Step Guide
Step 1: Create the Automation
-
Go to Communications > Automation > + Create
-
Enter a clear Name
-
(Optional) Add an internal description
-
Select Form Answer as the trigger
-
Toggle Send automatically: Yes
Step 2: Select the Trigger Form and Date Field
Choose the form that will trigger the automation.
Then select a date field that will act as the reference point for timing.
Most commonly: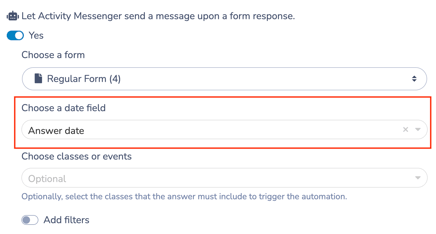
-
Answer date (submission date)
But you may also choose:
-
Any date field included in your form
Example:
-
Event date selected by the user
-
Start date entered in the form
Recipients
Recipients are automatically pulled from contacts who submit the selected form.
You may optionally restrict sending to participants registered in a specific class or event (see Step 3 below).
Step 3: Limit to Specific Class or Event (Optional)
You may optionally restrict the automation to recipients who are registered in one or more specific classes or events.
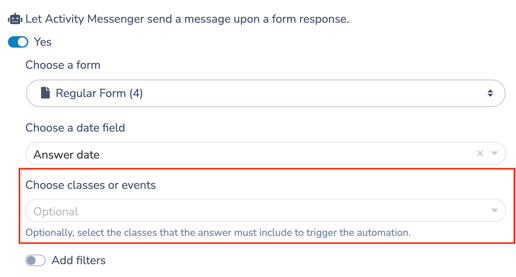
If selected, the automation will only send to contacts who:
-
Submit the selected form and
-
Are registered in the chosen class(es) or event(s)
Use this when:
-
A form applies to multiple programs, but the follow-up should apply only to certain classes
-
You want to condition a drip campaign on active registration
-
Communication should only go to participants of a specific activity
If no classes or events are selected, the automation applies to all form respondents.
🧭 How This Works
This condition acts as an additional filter.
Trigger = Form submission
Filter = Registration in selected class(es)
Message = Sent only if both conditions are met
Step 4: Set Timing
Choose when the message should send.
You can send the message:
-
Right after response, immediately after the Form is submitted
-
A set number of days before the selected date field
-
A set number of days after the selected date field
-
On the same day as the selected date field, using 0 days and a specific send timefilters
⚠️ Important: If the selected send time has already passed when the Form is submitted, the Automation will not send that message.
Timing is calculated individually for each form response based on the chosen reference date.
Examples:
-
Immediately after submission
-
2 days after submission
-
7 days after submission
💡 Tip: You can create multiple automations using the same form trigger to build a sequence.
Example:
-
Day 0 → Confirmation
-
Day 2 → Follow-up
-
Day 7 → Reminder
Step 5: Add Additional Filters (Optional)
You can further refine who receives the message based on form answers.
Select a form field and define a value it must contain.
Only contacts whose answers match the defined filter(s) will receive the message.
Examples
Send only if:
-
“Interested Program” contains “Summer Camp”
- "Did you enjoy this class?" contains "No"
Multiple Filters
You can add more than one filter.
⚠️ Important: Multiple filters use OR logic.
If you add more than one filter, the message sends when any one of the conditions is true.
Example
-
“Interested Program” contains “Ballet”
-
“Interested Program” contains “Dance”
The message will send if either condition is true.
Step 6: Configure Advanced Options (Optional)
Advanced Options further restrict who receives the message.
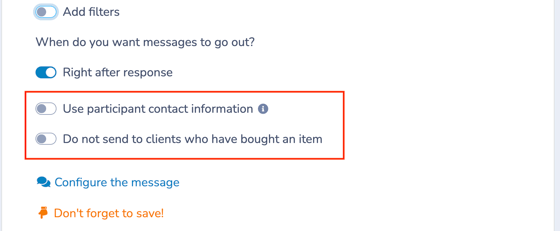
Available Options
-
Use participant contact information
Sends the message to the participant instead of the account owner (if available). -
Exclude clients who have purchased items
Use this option to prevent the Automation from sending to clients who have already purchased items from your Organization.When enabled, clients who have purchased items are excluded from the Automation.
You can also select Memberships as an exception. Clients who own one of the selected Memberships can still receive the Automation, even if they have purchased items from your Organization.
This is useful for drip campaigns where you want to avoid sending follow-up or promotional messages to clients who already purchased, while still allowing specific Membership holders to remain eligible.
-
Use this to:
-
Avoid sending sales emails to existing members
-
Prevent redundant communications
-
-
Step 7: Configure Your Message
-
Click Configure message
-
Choose one:
-
Write a new message
-
Select a Template
-
Select a Quick Message
-
-
Add attachments if needed
- Use placeholders to personalize your message.
Depending on the workflow, you can include:-
Confirmation details
-
Links to next steps
-
Additional instructions
-
Promotional offers
-
Step 8: Save and review the Simulation
Click Save to activate the automation.
Once saved and set to Send automatically: Yes, the automation will begin sending messages according to your configured timing and filters.
Automation Simulation
At the bottom of the automation configuration page, you will see the Simulation panel.
The Simulation automatically displays scheduled messages based on your current settings.
It allows you to verify:
-
Which respondents qualify
-
Which date field is being used for timing
-
When messages are scheduled to send
The Simulation does not send messages.
It reflects what the automation has scheduled.
💡 Best practice: After saving your automation, review the Simulation panel to confirm your timing and filters behave as expected.
4. 🧩 Key Configuration Notes
- Timing is calculated from the selected date field.
-
Supports multiple sequences by creating additional automations using the same trigger.
-
Works with placeholders from the form responses.
-
Additional filters allow conditional logic without creating separate forms.
5. Common Workflows
Below are typical operational uses for the Form Response automation.1️⃣ Immediate Confirmation
- Goal: Confirm submission and set expectations.
- Configuration:
-
Send immediately after submission
-
Include confirmation details
-
- Outcome:
User receives instant acknowledgment.
2️⃣ Free Trial Follow-Up Sequence
- Goal: Nurture leads over time.
- Configuration:
-
Day 0 → Welcome email
-
Day 3 → Feature overview
-
Day 7 → Upgrade invitation
-
- Outcome:
Structured communication without manual sending.
3️⃣ Event Reminder Based on Form Date
- Goal: Send reminder before a selected event date.
- Configuration:
-
Use form date field as trigger
-
Send 2 days before event
-
- Outcome:
Accurate reminders tied to user-selected dates.
4️⃣ Conditional Program Promotion
- Goal: Promote a specific program.
- Configuration:
-
Add filter: “Interested Program” contains “Summer Camp”
-
Send targeted follow-up
-
- Outcome:
Highly relevant communication based on form answers.
5️⃣ Survey Follow-Up
-
Goal: Send a thank-you and follow-up survey.
-
Configuration:
-
Send immediately after submission
-
Include survey link
-
- Outcome:
Respondents receive immediate acknowledgment and feedback collection increases.
6. 🧭 Workflow Design Tip
Use Form Response when communication is triggered by a submission event.
If timing depends on:
-
A class schedule → Use Class Reminder
-
First session date → Use Activity Start
-
Membership expiration → Use Membership Renewal
- Think in terms of what initiates the workflow:
-
Submission event → Form Response
-
Calendar date → Date-based automation
Related guides
-
Communications 105: Automating Email and SMS Messages
-
Abandoned Form Automation
-
Class Reminder Automation
-
Activity Start and Activity End Automation
-
Communications 103: Creating and Sending Messages
-
Communications 104: Message Assets
-
Communications 102: Building and Managing Lists
-
Templates: Creating and Using Reusable Email Layouts
-
Quick Messages: Creating and Using Text-First Operational Messages
-
Personal Information and Electronic Message Laws in Canada and the USA