

Activity Messenger offers multiple ways to send messages to your clients, participants, and contacts—directly from the context where your data already lives.
Because messaging is deeply integrated with forms, registrations, memberships, invoices, and client accounts, there is no single “send message” path. Instead, Activity Messenger lets you start a conversation from the exact workflow you’re already working in, ensuring messages are timely, relevant, and sent to the right audience.
In this guide, you’ll learn:
-
The main workflows for creating and sending messages
-
How the Message Creation interface works
-
The different entry points for messaging lists, respondents, members, invoices, and clients
By the end of this guide, you’ll be able to confidently send operational and marketing messages using the workflow that best fits your needs.
➡️ Next up: Communications 104 focuses on message assets: templates, media, samples, certificates, and reusable content for automation.
Covered in this guide
Use this section to quickly find the message creation option or sending workflow you need.
Part 1: Creating & Sending Messages
Part 2: Context-Based Messaging Workflows
These sections explain the different entry points for sending a message. All paths lead to the same Message Creation interface.
-
Messaging Through Automations (covered in Communications 105)
Part 1: Creating & Sending Messages
🧭 Orientation: Messaging in Activity Messenger Is Context-Driven
In Activity Messenger, you don’t “go to messaging” first and then figure out who to send to.
Instead, you typically start from the workflow you’re already working in—like a list, a form’s respondents, a class attendance list, an invoice, or a client account—and Activity Messenger pre-selects the most relevant audience.
This approach reduces manual audience building, prevents mistakes, and keeps communications tied to the records they relate to.
🧩 Pattern: One Message Creation Interface, Many Entry Points
No matter where you start, manual sending always leads to the same Message Creation interface.
Once you learn the interface, you can reuse that knowledge across every workflow in this article.
How to Create a New Message
🧭 When to use this workflow
Use this workflow when you want to send a one-off message without starting from a specific record (such as a list, form, invoice, or client account).
This is the most direct way to create a new message, and gives you full control over how the message is built, including audience selection, channel, and content.
Method 1 (Recommended)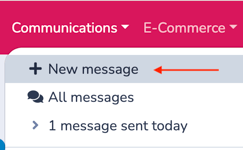
This is the simplest and most commonly used approach.
-
Go to Communications > + New message
-
The Message Creation interface opens
Method 2 (From Message Management)
This method is useful if you are already reviewing past messages.
-
Go to Communications > All messages
-
Click the blue + button
-
The Message Creation interface opens
Both methods lead to the same message creation workflow and allow you to define your audience, channel (email or SMS), and message content.
🧩 Pattern: Blank-slate message + pre-built audience
This workflow is commonly paired with a pre-created list that has been intentionally tailored to a specific audience.
It works especially well when you want to:
-
apply a template (for example, sending a newsletter)
-
schedule a message for later delivery (for example, a recurring or monthly newsletter)
Why this pattern works well
You get the speed and flexibility of starting from a blank message, while still benefiting from deliberate audience design through lists and segmentation.
➡️ If you need to build or refine audiences first, see Communications 102 (lists and segmentation).
New Message Interface Overview
The Message Creation interface is the central workspace used whenever you send a message manually.
Regardless of where you start (list, form, client account, invoice), this interface allows you to:
-
Define the audience (pre-selected based on entry point)
-
Insert placeholders (merge fields)
-
Apply Templates and attachments
-
Preview delivery and estimated SMS usage
-
Send immediately or schedule
Below is a detailed breakdown of each element in the interface, corresponding to the numbered indicators shown in the screenshot.
💡 For the best understanding of the full workflow, we recommend reading this entire section in order, from top to bottom.
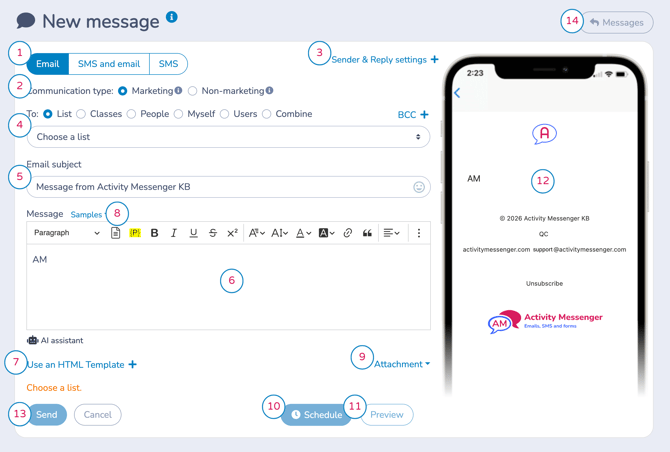
Interface Legend
Use the links below to jump to the description of each interface element.
| 1. Channel Selector | |
| 9. Attachments | |
| 3. Sender & Reply Settings | 10. Schedule a Message |
| 4. Audience Selector | 11. Preview Button |
| 5. Subject Line (Email) | 12. Preview Window |
| 6. Message Editor | 13. Send / Cancel |
|
14. Back to Messages |
1. Channel Selector (Email / SMS / SMS & Email)
Select how your message will be delivered:
-
Email – Email only
-
SMS – Text message only
-
SMS and email – Sends both formats in a single workflow
The interface dynamically adapts based on your selection (for example, SMS character count appears when SMS is enabled).
⚠️ Important
Before sending SMS messages, make sure you understand the key differences between SMS and email, including delivery rules, character limits, costs, and unsubscribe behavior.
When you write an SMS message, Activity Messenger adds required text around your message before it is sent.
The final SMS follows this structure:
[Organization Alias]: [Configured message] Reply STOP to opt-out.
Activity Messenger reserves at least 25 characters for the required opt-out text. In French, this requires at least 38 characters. Your Organization Alias is also added at the beginning of the SMS, so the total number of available characters depends on the length of your Alias and the language of the opt-out text.
Because SMS messages are billed by segment, a longer Alias, longer message, French opt-out text, special characters, accents, or emojis may cause the SMS to use more than one segment.
Use the SMS preview before sending to confirm the final message length and segment count.
These concepts are covered in detail in Communications 101: Foundational Concepts & Managing Unsubscribes.
2. Communication Type (Marketing vs Non-Marketing)
This setting determines how unsubscribe rules are applied.
-
Marketing
Used for promotions, announcements, newsletters, and outreach
→ Unsubscribe rules are enforced -
Non-marketing
Used for operational or transactional messages
(e.g. confirmations, reminders, invoices)
→ Unsubscribe rules do not block delivery
⚠️ Non-marketing messages are intended for operational or transactional communications such as confirmations, reminders, invoices, and service updates. Do not use non-marketing messages to send promotional content to unsubscribed recipients.
📌 This distinction is covered in detail in Communications 101: Foundational Concepts & Managing Unsubscribes.
3. Sender & Reply Settings
Sender & Reply settings control who the message appears to be from and where replies are sent. Understanding the difference between these two fields is important to ensure replies are handled correctly and that your messages look professional to recipients.
You can customize:
From email address
The From address determines what recipients see as the sender of the email in their inbox.
How it works:
-
If your Organization has configured a custom From email address using your own domain, emails will be sent from that address (for example:
info@yourorganization.com). -
If no custom From address has been configured, emails are sent from
info@activitymessenger.comby default.
Using a From address tied to your own domain improves:
-
Brand recognition
-
Trust and deliverability
-
Consistency with your Organization’s communications
➡️ To learn how to configure a From email address using your own domain, refer to Identity and Branding Setup.
Reply-to email address
The Reply-to address determines where recipient replies are sent when they click Reply in their email client.
By default:
-
The Reply-to address is set to the email configured in your Organization Information settings.
-
This allows replies to go directly to your Organization, even if the From address is system-based.
You may change the Reply-to address if:
-
Replies should go to a specific department or inbox
-
Multiple staff members monitor a shared email address
4. Audience Selector
Defines who will receive the message.
In this context, an audience refers to a set of one or more recipients selected based on lists, records, or context.
Audience options include:
List
Send the message to a single list.
This is the default option when starting from the Lists section.The list selector is the same one used for building Master Lists. You can select:
Any list you’ve created
Respondents from a form
⚠️ If you need to send to multiple lists at once, you must first create a Master List and select it here.
➡️ Refer to Building a Master List to Combine Multiple Lists.Classes
Send to class or attendance-based audiences.Click Choose classes or events to open the Class/Event Participant selector panel.
This is the same interface used when creating a Class / Event Participants list.➡️ For instructions refer to Building a Dynamic List from Classes or Events.
People
Select individual recipients directly from client accounts in your Organization.Useful for one-off or highly targeted communications.
Myself
Sends the message only to you.💡 Recommended for testing formatting, placeholders, and attachments before sending to a real audience.
Users
Send messages to internal users (staff), not clients or participants.Combine
Build an on-the-fly audience by combining:
Lists or form respondents
Individual clients
Internal users
This option is useful for quick, ad-hoc messaging without creating a reusable list.
When using Combine, you’ll be prompted to enter a List name.
This name is used only for reference and will appear as the recipient label for the message in the All Messages screen.
Blind Carbon Copy (BCC)
You can send a copy of the message to internal users by using the BCC option in the Audience Selector.
How it works:
-
Click BCC
-
Select one or more users
-
The message is sent to recipients and copied to the selected user(s)
This is commonly used to:
-
Keep staff informed of outgoing communications
-
Provide visibility to instructors, coordinators, or administrators
-
Archive operational communications internally
📌 Important limitations on placeholders
Not all placeholders are available to BCCed users:
-
Not available (will be empty):
-
Account owner information
-
Participant or child-related fields
-
-
Available:
-
Activity-related information
-
Zoom and virtual meeting details
-
Sending to Both Parents or Multiple Contacts
When messaging households or family-based records, Activity Messenger allows you to deliver messages to more than one contact associated with a participant.

Child Participants (Parents / Guardians)
If your messages concern child participants, you can choose to send the email and/or SMS to both parents or legal guardians.
How it works:
-
Activity Messenger automatically detects the second parent / legal guardian on the account coming from the Other parent question block
-
For Amilia-based lists, this corresponds to the second legal guardian stored in Amilia
-
For Upload (Excel / CSV) lists, this corresponds to the secondary parent fields you imported
When enabled, the message is sent to both parents, ensuring that important communications reach all guardians.
Adult Recipients with Secondary Contacts (Upload Lists)
If your recipients are adults and your list type is Upload (Excel / CSV), you can also send messages to a secondary contact imported in your file.
To do this:
-
Toggle Send to both parents
-
Activity Messenger sends the message to:
-
The primary recipient
-
The secondary contact (if present in the imported data)
-
This is useful for:
-
Households sharing communication responsibilities
-
Emergency or backup contacts
-
Ensuring visibility across multiple stakeholders
📌 Note:
The Send to both parents option is available only when secondary contact information exists and is supported by the selected list type.
5. Subject Line (Email)
Displayed only for email messages.
-
Required for Email and SMS + Email sends
-
Supports placeholders for personalization
Example:Reminder: {Activity name} starts soon
Deliverability Tip: Avoid Common Spam Triggers
Your subject line plays a major role in whether an email reaches the inbox or gets filtered as spam. To improve deliverability, avoid language that may appear overly promotional, misleading, or urgent.
Common spam-trigger words and patterns include:
- Free, 100% free
-
Limited time, Act now, Urgent
-
Winner, Congratulations
-
Cash, Money, Earn
-
Guaranteed
-
Click here
-
Buy now
-
Excessive punctuation (!!!)
-
ALL CAPS wording
⚠️ Important:
Activity Messenger displays a warning when potential trigger words are detected. These warnings are probabilistic—using a trigger word does not automatically disqualify your message or prevent delivery.

Best practice:
Use clear, factual subject lines that reflect the actual content of your message, especially for operational communications such as reminders, confirmations, and invoices.
6. Message Editor
The Message Editor is where you compose the content of your message.
From this editor, you can:
-
Write and format your message content
-
Insert links
-
Add images (email only)
-
Insert placeholders (merge fields)
-
Switch between paragraph and text styles
When SMS is enabled, the editor automatically displays:
-
Character count
-
Number of SMS segments
This helps you understand how your message will be delivered and billed before sending.
📌 Important notes
-
Email content is formatted using the Rich Text Editor.
➡️ Refer to Understanding the Rich Text Editor for a full breakdown of formatting tools and best practices. -
SMS messages use a simplified text editor and do not support rich formatting.
-
Placeholders allow you to personalize messages at scale (for example, names, class details, or dates).
➡️ For a complete walkthrough, see Personalizing Messages with Placeholders.
The Message Editor adapts automatically based on whether you are sending Email, SMS, or both, ensuring the correct tools and previews are always available.
7. HTML Template Selector
Allows you to apply a predefined email template to your message.
Templates control the overall layout, structure, and branding of your email messages—such as headers, footers, spacing, and visual styling—making it easy to create professional, visually engaging emails and newsletters.
Key points to know:
-
Applying a template does not lock the content
-
You can continue editing text, links, images, and placeholders after a template is applied (this will not affect the original template)
-
Templates apply to email content only
They define how the email version of your message is rendered. -
When sending a message via Email and SMS, recipients will receive:
-
The full HTML email in their inbox
-
A shortened link in the SMS that opens the same HTML message in their web browser
-
➡️ Templates are covered in depth in Communications 104: Templates & Assets.
8. Message Samples
Message Samples are pre-written content examples designed to help you get started quickly.
They are commonly used for:
-
Short operational messages
-
SMS-friendly communications
-
Frequently reused message patterns (confirmations, reminders, follow-ups)
You can:
-
Insert a sample directly into the editor
-
Modify it freely to fit your use case
-
Combine samples with placeholders for personalization
➡️ Message samples are also covered in Communications 104: Templates & Assets, alongside templates and certificates.
9. Attachments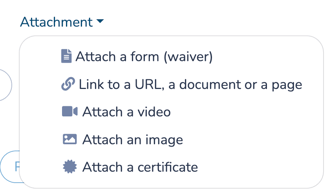
Attachments allow you to include additional resources and actions directly within your message. Available attachment options vary depending on whether you’re sending Email, SMS, or SMS and Email.
Attach a Form (Waiver, Survey, Intake Form)
-
Attaches a form to your message as a call-to-action button
-
Clicking the button opens the form directly
-
Commonly used for waivers, surveys, confirmations, or follow-ups
Link to a URL, Document, or Page
-
Generates a shortened link to the selected destination
-
The link appears as a button in emails and as a shortened URL in SMS
SMS link behavior
-
Links are shortened using Activity Messenger’s URL shortener:
https://am.lol/xxxxxxx -
SMS messages are limited to 160 characters
ℹ️ The am.lol domain is Activity Messenger’s official link-shortening service.
Attach a Video
You can include video content in two ways:
-
Link from YouTube or Vimeo
-
A preview thumbnail appears in email messages
-
SMS messages include a shortened link that opens the video platform
-
-
Upload a video via the Media button
-
Maximum file size: 500 MB
-
If sent by SMS, the link opens the hosting application
-
💡 If you’ve connected your YouTube or Vimeo accounts in Identity & Branding Setup, your public videos will be available directly from the Media library.
Attach an Image
-
Adds an image at the top of your email message
-
In SMS messages, the image is shared as a shortened link
Attach a Certificate
-
Attaches a certificate to your message
-
In SMS messages, the certificate is shared as a shortened link
-
Common use cases include:
-
Course completion or graduation certificates
-
Birthday party invitations
-
Achievement or participation acknowledgements
-
➡️ Certificates are also covered in detail in Communications 104: Templates & Assets.
10. Schedule a Message
Scheduling allows you to send a message at a future date and time instead of immediately.
To schedule a message:
-
Click Schedule
-
Choose a date and time
-
Optionally, add additional scheduled send times using the quick actions (+ 1 day, + 1 week)
-
Click Schedule to confirm
How Scheduling Works with Lists
When a message is scheduled and sent to a list, the audience remains dynamic until send time.
This means:
-
You can continue updating the list before the message is sent
-
New recipients added to the list will be included
-
Removed recipients will not receive the message
This is especially useful when:
-
Sending reminders for classes with ongoing registrations
-
Messaging lists that grow over time
Scheduling with Amilia-Based Lists
If you are sending a message to a list built from Amilia participants, members, or multipass holders, Activity Messenger will automatically:
-
Re-sync the list 30 minutes before the scheduled send
This ensures the final audience reflects the most up-to-date registration or membership data from Amilia.
Scheduling with Templates
If your message uses a template:
-
A snapshot of the template is saved at the time you schedule the message
-
Future changes to the original template will not affect the scheduled message
This allows you to safely reuse and modify templates for other messages without impacting already scheduled sends.
Billing Note
💡 You are not charged when scheduling a message.
Charges are applied only when the message is actually sent.
Tracking Scheduled Messages
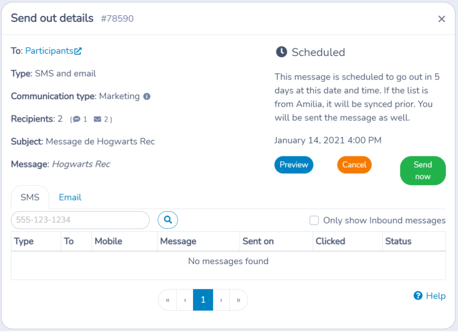
Scheduled messages are easy to identify and manage from the Communications > All Messages screen.
How to recognize scheduled messages:
-
A clock icon appears next to the message
-
The scheduled send date and time is displayed
Managing a scheduled message:
-
Click the message to open its details
-
From here, you can:
-
Preview the email or SMS content
-
Review the scheduled date and time
-
Send the message immediately
-
Cancel the scheduled send
-
Cancelling a Scheduled Message
You can cancel a scheduled message at any time before it is sent.
To cancel:
-
Open the scheduled message
-
Click Cancel
⚠️ Important:
Cancelling a scheduled message permanently deletes it. Once cancelled, the message cannot be restored and will not be sent.
11. Preview Button
The Preview button lets you test your message before sending.
Use it to:
-
See how the message will render for recipients
-
Validate placeholders (merge fields)
-
Check formatting across channels (Email and SMS)
💡 Best practice: Always use Preview when your message includes placeholders, attachments, or conditional content.
12. Preview Window
The Preview window shows exactly how your message will appear to recipients.
It includes:
-
Email preview
-
Desktop view
-
Mobile view
-
-
SMS preview
13. Send / Cancel
-
Send – Sends immediately. Click Send when you've finished configuring your message.
-
Cancel – Discards the message draft
Once sent, the message is logged in Communications > All messages.
14. Back to Messages
Returns you to the message management screen without sending.
Part 2: Context-Based Messaging Workflows
🧭 Start Where the Record Lives
Context-based workflows let you send messages from the exact place your data lives—such as a list, form, class, client account, membership, or invoice.
Each entry point:
-
Pre-selects the appropriate audience
-
Reduces manual selection steps
-
Lowers the risk of sending to the wrong recipients
-
Keeps messages tied to the record they relate to
📘 In every case, you will land in the Message Creation interface described above.
Covered in Part 2:
Click on the title to jump to its description
-
Messaging Through Automations (covered in Communications 105)
Sending a Message to a List
Lists are the most common way to send messages in Activity Messenger. If you often find yourself in the list management section, you can use the following path to send a particular list a message.
To send a message to a list:
-
Go to Lists > Manage Lists
-
Open the desired list (or choose a list from your pinned lists directly in the dropdown menu)
-
Click New Message
The Message Creation interface opens with the list preselected
➡️ See Communications 102 for list creation and management.
Sending a Message to Form Respondents
Each form includes a Respondents tab that acts like a live list of people who completed that form.
To message form respondents: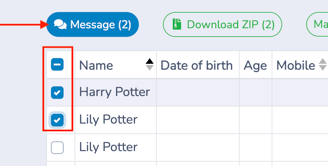
-
Open the form
-
Go to the Respondents tab
-
Apply filters if needed
-
Select one or more respondents using the checkboxes to the left of their name.
At the top of the list:
-
If one or more respondents are selected, click Message
-
If no respondents are selected, the button reads Message all
The Message Creation interface opens with the selected respondents automatically pre-selected as the audience. If no respondents are selected, all respondents are included.
💡 Tip:
Use the checkbox at the top of the column to select or deselect all visible respondents on the page. You can control which respondents are visible by combining filters and pagination controls, making it easy to message large or highly specific subsets of form respondents.
Sending a Message to an Attendance List
Attendance and registration lists allow you to message participants tied to a specific class, event, or session. This workflow is designed for time-sensitive, operational communication linked directly to attendance data.
Typical use cases include:
-
Class reminders and last-minute cancellations
-
Day-of operational updates
-
Instructor-led or staff-initiated communications
-
Messaging specific occurrences or dates within a session
How to Message Participants from an Attendance List
-
Go to Classes > All attendance lists.
-
Open the desired class or event by clicking on its row.
-
Apply filters if needed (date, attendance status, etc.).
-
Select one or more participants using the checkboxes to the left of their names.
-
Click Message above the participant list.
Choose Your Messaging Option
After clicking Message, you’ll be prompted to choose how the message should be sent:
-
Participants
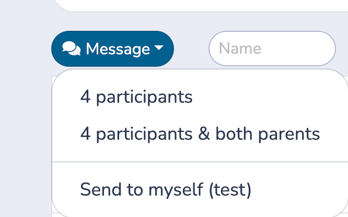
Sends the message to the participant, or to the primary parent (account owner) in the case of a child registration. -
Participants & both parents
Sends the message to the primary parent (account owner) and the secondary parent or guardian, when available. -
Send to myself (test)
Sends a test message only to you.
📌 Important – Child Participants
When participants are children, the account owner (primary parent or guardian) is the default recipient.
If you choose Participants & both parents, Activity Messenger will also message the secondary parent/guardian captured in the form via the Other parent question block.
After selecting the appropriate option, the Message Creation interface opens with the relevant participant audience already selected.
➡️ If you need help navigating attendance views or filters, refer to Class / Events 102.
📌 Attendance-based messaging is operational by nature and should typically be marked as Non-marketing.
⚠️ Non-marketing messages are intended for operational or transactional communications such as confirmations, reminders, invoices, and service updates. Do not use non-marketing messages to send promotional content to unsubscribed recipients.
Sending a Message to Members
When a membership is applied to a client—either through a purchase or by an administrator—Activity Messenger automatically creates a membership-based list.
This list appears in Lists > Manage Lists, which means you can message all members by following the standard steps outlined in Sending a Message to a List.
In addition to that approach, Activity Messenger also provides a more direct path that lets you message specific members within a given membership.
How to message members
-
Go to E-commerce > Memberships
-
Locate the desired membership
-
In the Members column, click the
 icon showing the number of members
 -
Apply filters if needed (for example: date, status, or other available criteria)
-
Select one or more members using the checkboxes next to their names
-
Leave all unchecked to message all members
-
-
Click Message
The Message Creation interface opens with the selected member audience automatically pre-selected.
Common use cases
-
Member-only announcements
-
Membership expiration reminders and follow-ups
-
Renewal or upgrade communications
💡 Tip: Membership messaging pairs especially well with automations for renewals and lifecycle communications. Automations are covered in Communications 105.
Sending a Message from an Invoice
Invoices provide a highly contextual entry point for messaging. While Activity Messenger includes built-in workflows for sending invoice copies and payment links, there are situations where you’ll want to send a custom, one-off message tied to a specific invoice.
➡️ For a full walkthrough of the Invoice Manager interface, refer to Invoice Management 101.
This section focuses on that use case.
From an invoice, you can send messages to:
-
Follow up on unpaid balances
-
Send payment reminders
-
Provide clarifications or additional details
-
Communicate about invoice-related issues
Messaging from an invoice ensures that:
-
The correct client is automatically targeted
-
The message is sent in the context of the invoice’s client record
-
The communication remains directly tied to the financial record
How to send a message from an invoice
-
Go to E-commerce > Invoices
-
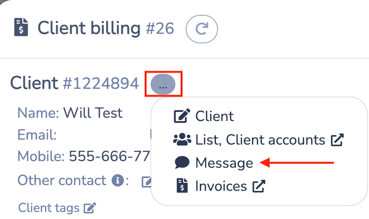
Locate the desired invoice and click the row to open the Invoice Manager
-
At the top left, next to the client information, click the three-dot menu (⋯)
-
Click Message
The Message Creation interface opens with the invoice’s client automatically pre-selected as the audience.
📌 Important:
Invoice-based messaging should usually be treated as non-marketing because it is tied to service delivery or financial communication. Do not include promotional content unless the message is correctly classified and compliant with your Organization’s communication rules.
Sending a Message to Clients via Client Accounts
You can send messages directly to one or more clients from the Client Accounts interface. This workflow is ideal when you need to communicate at the account level, rather than based on a registration, class, or list.
How to message clients from Client Accounts
-
Go to Lists > Client Accounts
-
Use filters or search to locate the desired client(s)
-
Select one or more clients using the checkboxes next to their names
-
Click Message
The Message Creation interface opens with the selected client(s) automatically pre-selected as the audience.
When to use this workflow
This approach is best suited for:
-
Direct, personalized communication
-
Account-level follow-ups
-
Administrative or support-related messaging
-
One-off outreach that doesn’t require a reusable list
➡️ For a detailed discussion of client accounts, refer to Client Accounts: Understanding Activity Messenger’s Built-In CRM.
Messaging Through Automations
Activity Messenger also supports sending messages automatically based on events, schedules, and client activity.
Automated messaging enables highly contextual communication that adapts to your operational workflows—for example, sending reminders, confirmations, follow-ups, or status-based notifications without manual intervention.
Because automation is a broad and powerful topic, it is covered in detail in a dedicated article:
➡️ Communications 105: Automating Messages
Related guides