

Once a message is created in Activity Messenger, whether sent manually, scheduled, triggered by an Automation, or generated by a transaction, the system creates a send-out instance that can be tracked and managed.
This guide explains how to use the All Messages dashboard to review delivery status, track engagement, investigate delivery issues, manage scheduled messages, respond to SMS replies, and analyze conversion performance.
Use this guide as a reference when you need to understand what happened after a message was created, scheduled, sent, or generated automatically.
📌 At a Glance
Activity Messenger tracks every sent message as a send-out instance, allowing administrators to monitor delivery, engagement, replies, and conversions from a centralized dashboard.
Definition
The All Messages dashboard is the operational monitoring system for every message sent through Activity Messenger.
Use it when
You want to:
• track message delivery
• analyze engagement performance
• investigate delivery issues
• review automation send-outs
• manage scheduled messages
• respond to SMS replies
Inputs
• send-outs created by manual messages
• automated messages
• transaction confirmations
Outputs
• delivery and engagement metrics
• recipient-level tracking
• reply management
• conversion analytics
Key rules
• Each row represents one send-out instance.
• Send-outs cannot be edited once generated.
• Message assets (templates, quick messages) are edited elsewhere.
• SMS replies are managed inside Activity Messenger.
• Email replies are handled externally.
Related features
Templates • Quick Messages • Automations • Lists • Forms
Covered in this guide
Use this section to quickly find the message monitoring or follow-up area you need.
1. 🧭 Orientation: The Message Lifecycle
Every message in Activity Messenger follows the same lifecycle:
Draft → Scheduled (optional) → Sent → Delivered → Engaged → Converted (optional)
Templates and Quick Messages are building blocks.
They are not send-outs until they are scheduled or sent.
Messages can originate from:
-
Manual sends
-
Automations
-
Transaction confirmations
-
Scheduled one-time messages
Once a message is generated, it becomes an independent send-out instance.
Regardless of origin, all send-outs:
-
Follow the same lifecycle
-
Are managed in Communications > Messages
⚙️ Message Execution Model
Messages in Activity Messenger follow a consistent execution model:
Message assets
Templates and Quick Messages define reusable content.
Send-out instances
When a message is sent (manually, scheduled, or automated), the system generates a send-out instance.
Delivery tracking
The system records delivery status for each recipient.
Engagement tracking
Email opens, clicks, SMS replies, and interactions are recorded.
Conversion tracking
If a message links to a form, the system tracks completed submissions.
All monitoring and analysis occur inside the All Messages dashboard.
2. The All Messages Dashboard
Path: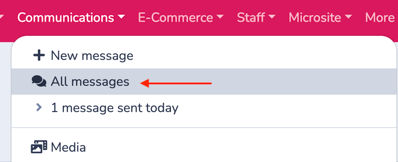
Communications > All Messages
The All Messages dashboard is the operational control center for every message sent through your organization.
From this dashboard, you can:
-
Review upcoming scheduled sends
-
Confirm recipients and delivery status
-
Skip or cancel scheduled send-outs
-
Investigate automation-generated messages
-
Monitor engagement and delivery results
Important Distinction
This dashboard is for managing send-outs, not editing message assets.
You do not modify Templates, Quick Messages, or automation rules here.
Scheduled messages are individual send-out instances.
Each row represents one send-out, whether it was:
-
Sent manually
-
Scheduled as a one-time message
-
Generated by an automation
-
Triggered by a transaction
-
Delivered as email or SMS
If you need to change the rule or message structure, return to the relevant configuration area.
The All Messages dashboard is where you manage and analyze what has already been created and sent.
Below is a guided walkthrough of the interface.
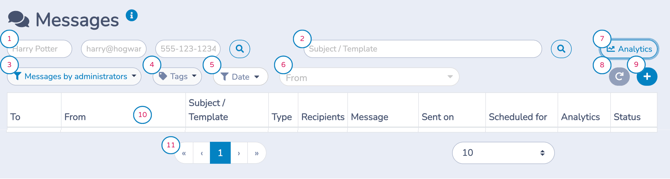
Each element corresponds to the numbered markers in the screenshot above.
Click a numbered title to jump directly to its description.
1. Recipient Search Fields
Search by:
-
Recipient name
-
Email address
-
Phone number
Use this when:
-
A client says they did not receive a message
-
You need to investigate a specific contact
-
You want to confirm what was sent to someone
2. Subject / Template Search
Search by:
-
Email subject line
-
Template name
Useful for:
-
Reviewing performance of a specific campaign
-
Auditing automation outputs
-
Finding all sends tied to a template
3. Primary Filter Dropdown
The Primary Filter dropdown allows you to quickly filter messages by category.
Available filters include:
-
Messages by administrators
-
SMS messages
-
Marketing only
-
Published as a web page
-
New received messages
-
All received messages
-
Scheduled send-outs
-
Form filled confirmations
-
Purchase confirmations (with or without invoice)
-
Automation messages
-
Connection code messages
Use this filter to isolate specific workflows or message types.
The Received message filters are especially useful for managing replies and ensuring inbound messages are reviewed and handled promptly.
4. Tags Filter
Use the Tags filter to narrow results by tags applied to Templates.
Tags allow you to categorize message templates by initiative, program, or campaign type.
This is useful when:
-
Templates are organized by campaign or workflow
-
You want to review messages tied to a specific initiative
-
You need to analyze performance by category
The filter displays all messages generated from templates that carry the selected tag.
5. Date Filter
Filter messages by send date.
Common uses:
-
Reviewing weekly sends
-
Auditing a specific time period
-
Investigating delivery on a specific day
6. From Filter
Use the From filter to narrow results by sender identity.
This allows you to:
-
Identify messages sent by a specific administrator
-
Search by sender name or email address
-
Audit communication activity by team member
This is especially useful when multiple administrators send messages from the same organization.
7. Global Analytics Button
Click Analytics to open overall communication performance metrics across all messages currently displayed.
This view is different from row-level analytics.
Row-level analytics show results for a single send-out.
Global Analytics aggregates performance across multiple messages.
Click More… to reveal additional metrics such as:
-
Skipped by admins
-
Errors
The analytics view reacts to your active filters.
This means you can analyze performance for a specific segment, such as:
-
SMS messages only
-
Marketing emails only
-
Automation messages
-
A specific date range
Use this feature to:
-
Review aggregate performance
-
Monitor engagement trends
-
Identify delivery issues at scale
-
Compare campaign performance across segments
8. Refresh Button
Refreshes the dashboard.
Important when:
-
Sending large batches
-
Waiting for status updates
-
Monitoring background processing
9. New Message Button (+)
Click the (+ ) button to create a new manual message.
This opens the Message Creation panel, described in Communications 103.
Use this method when you want to:
-
Send a one-time message
-
Schedule a message for a future date
-
Broadcast communication to a selected audience
This button is used for manual workflows, not automation rules.
10. Message Columns and Row Actions
Each row represents a single send-out. The columns provide operational visibility at a glance:
-
To — Recipient name or list reference
-
From — Sender identity (email address or SMS number)
-
Subject / Template — Subject line or template used
-
Type — Email or SMS
-
Recipients — Number of recipients included in the send
-
Message — Preview snippet of the content
-
Sent on — Actual send date and time
-
Scheduled for — Planned send time, if applicable
-
Analytics — Engagement snapshot (open and click rate icons)
-
Status — Current delivery state
This layout allows you to quickly scan performance and delivery without opening additional screens.
Click any row to open the Send Out Details panel (described below), where you can view recipient-level status, engagement data, replies, and resend options.
🧩 Pattern: One Row = One Send-Out
Important structural concept:
Each row represents a single send-out instance.
That means:
-
An automation running daily creates multiple rows over time
-
A manual message to 10 recipients appears as one row
-
Scheduled messages appear independently
Automations generate rows.
This dashboard displays execution.
11. Pagination Controls
Use pagination to:
-
Navigate between pages
-
Audit historical sends
-
Manage large message volumes
The dropdown on the right allows you to control how many rows display per page.
3. Understanding Message Statuses
Each message displays a status that reflects where it is in the lifecycle.
Common statuses include:
-
Scheduled – Message is queued for future delivery
-
Sent – Message was successfully sent to recipients
-
Delivered – Successfully delivered (SMS dependent on carrier confirmation)
-
Opened – Email was opened (email tracking dependent on image loading)
-
Clicked – A link inside the message was clicked
-
Skipped by admin – Manually skipped before sending
-
Error – Message failed to send
Understanding these states reduces confusion and support inquiries.
4. Tracking Engagement and Conversion (Send Out Details)
Click on any row in the All Messages dashboard to open the Send Out Details panel.
This panel provides detailed, recipient-level tracking for a specific send-out.
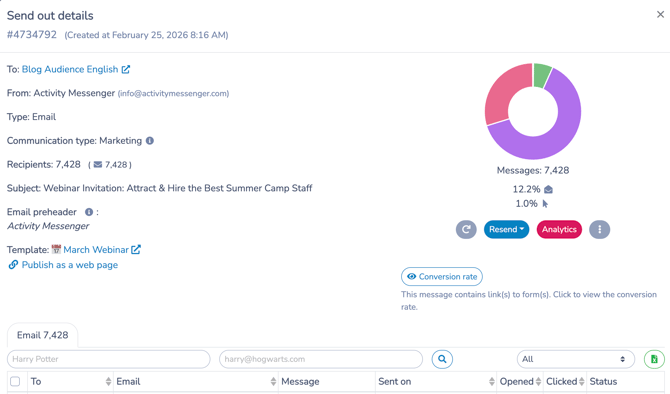
It shows:
-
Message metadata (subject, template, channel)
-
Delivery status
-
Engagement metrics
-
Conversion performance (if applicable)
-
Resend and analytics actions
This is your diagnostic and investigative tool.
If something appears incorrect, this is where you look first.
Message Overview (Header Section)
At the top of the panel, you will see:
-
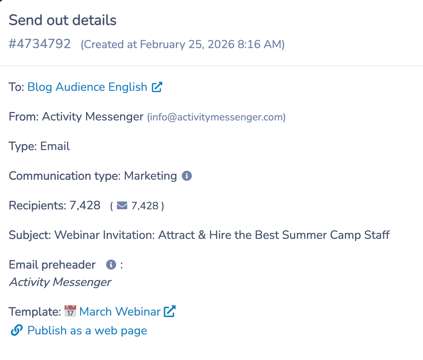 Send-out ID and creation timestamp
 -
Recipient reference (To)
-
Sender identity (From)
-
Type (Email or SMS)
-
Communication type (Marketing or Non-marketing)
-
Number of recipients
-
Subject line
-
Email preheader (if applicable)
-
Template used
-
Option to publish as a web page (if enabled)
This confirms exactly what was sent and under which configuration.
Engagement Summary (Donut Chart)
A visual summary appears on the right side of the panel.
For email, this includes: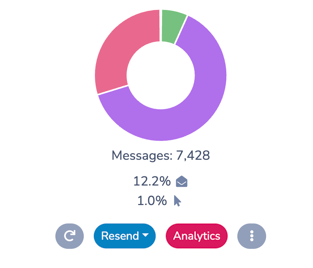
-
Total messages
-
Open rate percentage
Additional engagement details are available below in the recipient table.
Engagement Metrics
For Email
-
Recipients — Total intended recipients
-
Sent — Successfully processed by the system
-
Delivered — Provider acknowledged receipt
-
Opened — Number and percentage of opens
-
Clicked — Number and percentage of link clicks
Note: Open tracking depends on the recipient’s email client loading images.
For SMS
-
Sent — Successfully sent
-
Delivered — Carrier confirmation (if available)
-
Replies — If applicable
Resend & Additional Actions
Resend Options
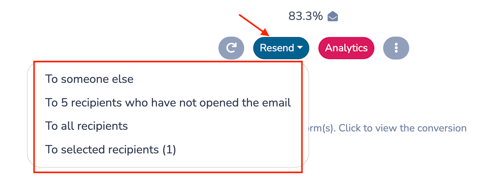
The Resend dropdown allows you to:
-
Send to someone else
-
Send to recipients who have not opened
-
Send to all recipients
-
Send to selected recipients (use the checkboxes next to recipient names)
This is useful for:
-
Sending follow-up reminders
-
Reaching recipients who missed the original message
-
Correcting recipient errors
-
Improving overall engagement rates
Each resend creates a new, independent send-out instance, with its own tracking and analytics.
Additional Actions (⋮)
The Additional actions menu (⋮) provides extra controls, depending on the configuration of the send-out.
Available options may include:
-
Recreate template — Duplicate the content of this send-out as a new template
-
Download CSV of recipients who have not opened — Export a list for targeted follow-up
These tools help you optimize campaigns, segment follow-ups, and reuse high-performing content efficiently.
Conversion Tracking
If the message contains a link to a form, a Conversion rate button appears automatically.
A conversion is recorded when a recipient submits the linked form.
If the linked form is a payment form, the conversion represents a completed purchase or registration.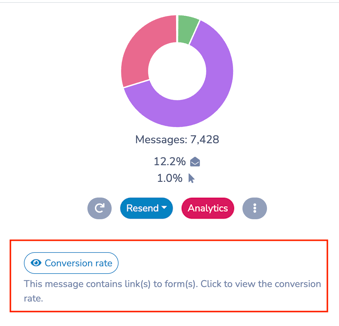
Click the Conversion rate button to view and analyze the conversion performance for that send-out.
Example
A newsletter is sent with a link to register for a webinar.
The Conversion rate will display the percentage of recipients who completed the webinar registration form.
This allows you to measure not just engagement (opens and clicks), but actual outcomes, helping you assess:
-
The effectiveness of your newsletter
-
The relevance of your offer
-
The overall health and responsiveness of your mailing list
Recipient-Level Tracking
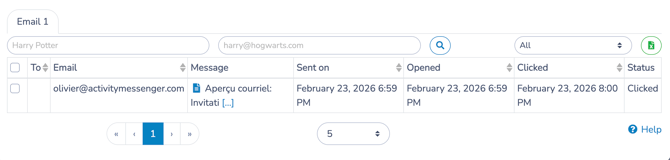
The lower section of the Send Out Details panel displays a recipient-level tracking table.
From here, you can:
-
Search for specific recipients by name or email
-
Filter recipients by status using the Status Filter dropdown ("All" dropdown menu)
.png?width=208&height=209&name=Status%20Filter%20(Send%20out%20details).png)
-
Export recipient data to Excel using the green Excel button
This is especially useful for identifying:
-
Recipients who did not open
-
Recipients who encountered delivery errors
-
Contacts who unsubscribed or bounced
-
Highly engaged recipients
Table Columns
Each row displays:
-
Recipient name
-
Email address or phone number
-
Message preview
-
Sent timestamp
-
Opened timestamp (if applicable)
-
Clicked timestamp (if applicable)
-
Current status
From this table, you can:
-
Open the exact message that was sent by clicking the blue document icon
-
Identify who opened or clicked
-
Detect delivery issues at the individual level
-
Confirm engagement timing
-
Investigate specific complaints, bounces, or unsubscribe events
🧭 Operational Reminder
The Send Out Details panel is used for tracking and analyzing a specific send-out.
It does not modify:
-
The original message
-
The automation rule
- The recipient list or placeholders used
If you need to modify future messages, return to:
-
Communications 103 — Manual & Scheduled Messages
-
Communications 104 — Templates & Quick Messages
-
Communications 105 — Automations
Communications 106 focuses on monitoring, analyzing, and responding to messages after they have been created and sent.
5. Handling Replies (Email & SMS)
Activity Messenger supports reply management for both Email and SMS messages.
How replies are handled depends on the communication channel.
Email Replies
Recipients can reply directly to email messages.
Email replies are sent to the configured Reply-To address.
You should configure this in:
Organization Settings > Messaging > Reply-To Email
Email replies are handled in your external email provider (Gmail, Outlook, etc.).
They are:
-
Delivered to your configured inbox
-
Associated with the original sender
-
Available for follow-up directly in your email system
Activity Messenger does not manage inbound email conversations inside the platform.
SMS Replies Overview
SMS replies are managed directly inside Activity Messenger.

When a recipient replies to an SMS:
-
You will see a notification on your Home dashboard
-
Click “Go see those messages” to open the All Messages dashboard filtered to inbound SMS
You can also manually access replies:
Communications > All messages > Primary Filter > New received messages
SMS View
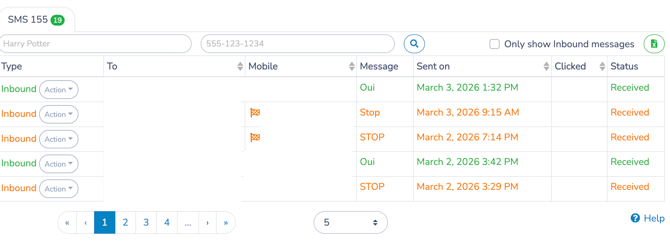
Inbound SMS messages appear in the All Messages dashboard with:
-
Type: Inbound / Outbound
-
Status
-
Message content displayed in the Message column
-
Date sent
-
Click Activity
A green badge next to SMS indicates the number of unread inbound replies.
You can:
-
Filter by inbound messages
-
Search by name or phone number
-
Export messages to Excel
Replying to Inbound SMS
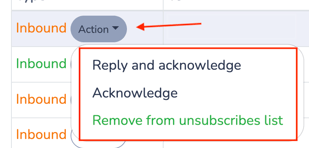
For inbound SMS messages, each row includes an Action dropdown.
This allows you to manage the reply directly from the dashboard without opening the full message details panel.
Available actions include:
Reply and acknowledge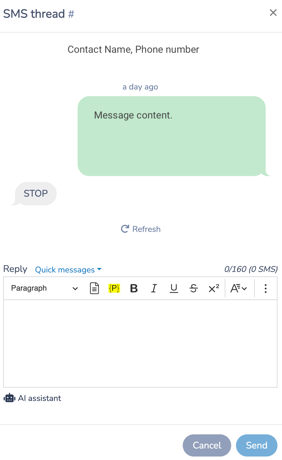
Opens the SMS Thread screen, displaying the full conversation history with that contact.
From this view, you can:
-
Review the complete message exchange
-
See inbound and outbound messages in chronological order
-
Reply directly within the thread
-
Use Quick messages for faster responses
-
Use the AI assistant to help draft replies
When you click Send, the reply is delivered and the inbound message is marked as acknowledged.
Use this option when:
-
-
You want to respond immediately
-
A conversation requires context
-
You need to clarify, confirm, or follow up
-
You want to close the conversation loop
-
💡 Tip: If you find yourself sending the same response repeatedly, create a Quick Message and reuse it from the Quick messages dropdown.
➡️ Refer to Communications 104 for setup guidance.
Acknowledge
Marks the message as reviewed without sending a reply.
Use this when:
-
-
No response is required
-
The message has been handled outside the platform
-
The inbound reply is informational only
-
Acknowledged messages are removed from the “new/unread” count.
Add or Remove from unsubscribes list
Manually unsubscribe or re-enable a phone number that is currently flagged in the Unsubscribes list (for example, after a STOP message).
Use this when:
-
-
A contact requests to be re-subscribed manually
-
An unsubscribe occurred by mistake
-
You need to manually opt-out a contact
-
⚠️ Only re-enable contacts when you have proper consent.
SMS Commands
Recipients can send keyword commands to manage their SMS subscription:
-
STOP — Unsubscribe from SMS
-
START — Re-subscribe to SMS
When a recipient sends STOP:
-
They are automatically added to the Unsubscribes list
-
They will not receive future SMS messages
-
The inbound message is logged with status Received
-
The message line appears in orange and the contact is flagged
If a recipient sends an invalid keyword, you can manually manage their subscription status using:
Action dropdown > Add or Remove from unsubscribes list
Operational Note
Unsubscribed contacts will not receive future SMS messages, including non-marketing messages, until they are re-enabled.
Received and forwarded SMS messages are logged in the system and billed at standard SMS rates.
6. Troubleshooting Delivery Issues
If a message fails or underperforms, check:
-
Send Out Details panel
-
Recipient-level delivery status
-
Unsubscribe status
-
Invalid email addresses
-
SMS opt-out status
-
Spam filtering indicators
Most issues can be identified at the recipient level inside the message details panel.
Where to Look First When Something Goes Wrong
Examples:
If a client says:
-
“I didn’t receive the message” → Check recipient-level status.
-
“The automation didn’t work” → Check if a send-out was generated.
-
“The link didn’t convert” → Check Conversion rate.
7. Best Practices for Ongoing Monitoring
To maintain healthy communication operations:
-
Review scheduled messages daily
-
Monitor high-value automation performance weekly
-
Audit conversion-driven automations monthly
-
Investigate delivery errors promptly
-
Respond to replies within internal SLA guidelines
Related guides
-
Communications 103: Creating and Sending Messages
-
Communications 104: Message Assets
-
Communications 105: Automating Email and SMS Messages
-
Communications 101: Foundational Concepts and Unsubscribe Management
-
Communications 102: Building and Managing Lists
-
Messaging Defaults
-
Sending Emails from Your Own Domain
-
Personal Information and Electronic Message Laws in Canada and the USA