

Certificates in Activity Messenger are personalized, data-driven documents generated automatically using placeholders.
They allow you to design a certificate once, then generate individual versions for each recipient — without Excel files, Word mail merge, or manual editing.
Certificates can be:
-
Printed individually or in bulk
-
Downloaded as a combined PDF
-
Sent by email (embedded and attached)
-
Sent by SMS (via secure link)
-
Inserted into reusable message templates
Common Certificate Examples
Certificates can be used in many operational and celebratory scenarios. Common examples include:
-
🏊 Swim completion certificates
-
🎓 Course or camp completion certificates
-
📊 Report cards and evaluation summaries
-
🏅 Recognition awards (Most Improved, Leadership Award, etc.)
-
🎂 Birthday certificates or celebration cards
-
📚 Program milestone achievements
-
🧑🏫 Instructor evaluation summaries
-
🏕 End-of-season camp certificates
Covered in this guide:
Use this section to quickly find the Certificate concept or workflow you need.
➡️ This guide is part of Communications 104: Message Assets.
1. What Certificates Are (and How They Work)
Certificates are reusable document blueprints that generate personalized output based on real participant data.
Unlike templates (which structure messages), certificates structure printable documents.
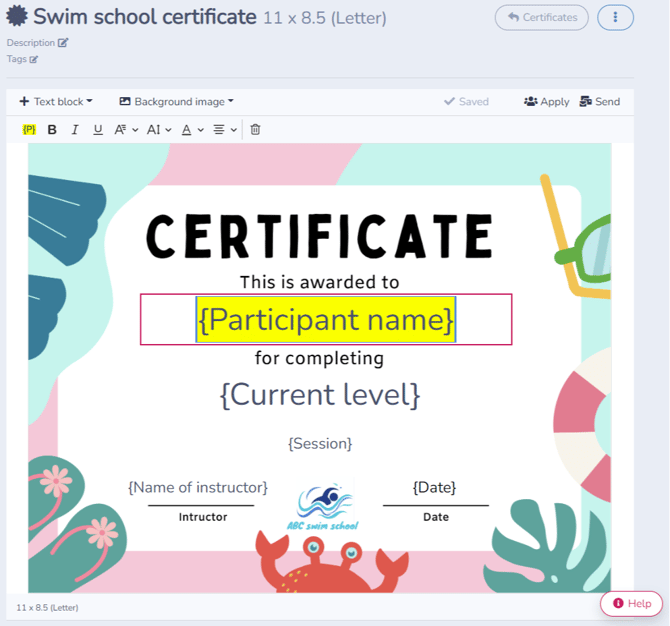
🧭 Orientation: Certificates as Personalized Artifacts
A certificate is not a message.
It is a reusable document design that pulls data from a list or form at generation time.
Certificates:
-
Define layout and visual structure
-
Use placeholders for personalization
-
Are generated per recipient when applied or sent
-
Can be reused across multiple classes, sessions, or cohorts
🧩 Pattern: Design → Data → Delivery
Certificates follow a clear three-step model:
-
Design
Create the certificate layout and insert placeholders where personalized information should appear. -
Data
Apply the certificate to a list or form. Activity Messenger pulls the relevant data (names, dates, results, etc.) and replaces each placeholder.
At generation time, Activity Messenger replaces placeholders using the data available from the selected source, such as a List, Form submission, registration, or assessment.
If a selected recipient does not have matching data for a placeholder, that placeholder field may appear empty in the preview or generated Certificate. -
Delivery
Generate and distribute the personalized certificates — by printing, downloading as a bulk PDF, embedding in email template, attaching to a message, or sending via SMS link.
This order matters:
-
The design stays reusable.
-
The data changes each time.
-
The delivery method is flexible.
That separation lets you reuse the same certificate design again and again, even as the names and details change.
Printing vs Emailing: Choosing the Right Workflow
Certificates support multiple operational models:
Email-first model:
-
Send report cards and certificates digitally
-
Parents print at home
Print-first model:
-
Download bulk PDF
-
Print and distribute in person
Hybrid model:
-
Print in class
-
Email a copy for records
The same certificate design supports all three approaches.
2. Creating a Certificate
To create a new certificate:
-
Go to More
-
Click + New certificate
-
Choose a sample or start from scratch
Certificate Formats
Certificates are designed for print-ready output.
Available formats:
-
Standard Letter (8.5" x 11")
-
Portrait
-
Landscape
-
-
Name badges (Avery 5392)
-
6 per page
-
Portrait layout
-
To choose the format that matches how you plan to distribute your certificates, start from scratch.
Other Interface Elements
From the certificate editor interface, you can also: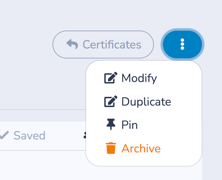
-
Return to Certificates management
-
Open the Certificate Actions menu (⋮) for additional options:
Available actions include:
-
Modify – Edit the current certificate Name, Description for internal use and language
-
Duplicate – Create a copy to reuse or adapt
-
Pin – Keep the certificate at the top of your list for quick access
-
Archive – Remove it from active use without deleting it
Archived certificates are no longer available for new sends, but any previously generated or sent certificates remain unaffected.
Directly under the certificate title, you can: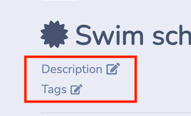
-
-
-
-
-
Add or edit a Description
-
Add or modify Tags
-
-
-
-
The description helps clarify the purpose of the certificate (for example, Level 3 Completion – Fall 2026).
Tags help organize and filter certificates in the management view, especially if you create certificates for multiple programs, sessions, or locations.
This makes it easier to quickly find and reuse the right certificate later.
3. Designing the Certificate
A certificate includes:
-
A background image
-
One or more text fields
-
Placeholders for personalization
Step 1: Choose a Background Image
The background image defines the visual look of your certificate.
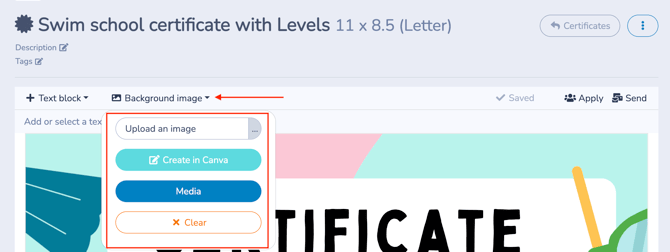
You can:
-
Upload your own background image
-
Drag and drop a file from your computer into the upload area
-
Click the … menu to browse files from your computer
-
-
Use Canva to design a certificate background (it will automatically upload to Activity Messenger)
-
Open the Media Library to choose an existing image or browse royalty-free images from Pexels
Best Practice
Choose a background with clear blank areas where personalized text (names, dates, levels, etc.) will appear.
This makes it easier to position placeholders cleanly and ensures the final certificate is readable when printed or viewed on screen.
Save as You Go
After making changes to your certificate (background, text fields, placeholders, layout), click the Save icon to preserve your work.
Saving regularly ensures your design updates are not lost before applying or generating certificates.
Step 2: Add Text and Placeholders
Next, add text fields to define what information will appear on the certificate.
Each text field can contain: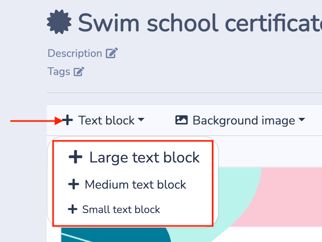
-
Static text (for example: Certificate of Completion)
-
Placeholders (for example:
{Participant first name})
Placeholders allow each certificate to be personalized automatically.
How to Insert Placeholders
To add a placeholder to a text block:
-
Click inside the text field
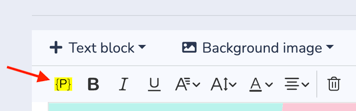
-
Click the Placeholders icon
-
Select the desired placeholder from the list
The placeholder will be inserted into your text.
Removing a Text Field
If you need to delete a text field:
-
Click inside the text box
-
Click the trash icon in the Rich Text Editor
The text field will be removed from the certificate layout.
➡️ If you need help formatting text (font size, alignment, styling), refer to Understanding the Rich Text Editor.
At generation time, placeholders are replaced automatically using data from:
-
Uploaded lists
-
Form submissions
-
Registration data
-
Assessments
Any form question can become a placeholder.
➡️ See Placeholders documentation for full details.
4. Applying a Certificate to a List
Once your certificate design is complete, you generate personalized certificates by applying it to a data source.
This step allows you to preview, print, or download certificates in bulk.
Note:
If your goal is to deliver certificates by email or SMS, skip ahead to Sending Certificates by Email or SMS, where certificates are generated automatically at send time.

Click Apply, then choose:
-
A list you uploaded
-
A dynamically built list
-
A form response list
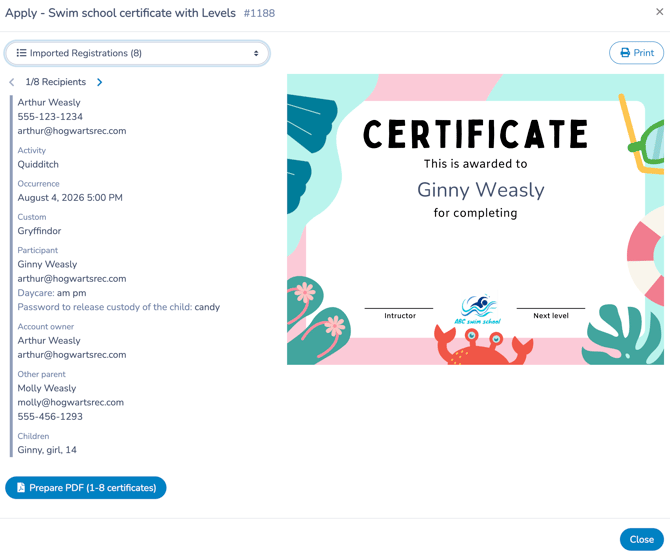
The Apply interface displays:
-
A list of recipients on the left
-
A live preview of each personalized certificate on the right
This preview allows you to validate your placeholders before printing or sending.
⚠️ Important:
If a placeholder cannot find matching data for a recipient, that field will appear empty in the preview.
From this screen, you can:
-
Cycle through recipients
-
Confirm that placeholders are populated correctly
-
Print button
Print individual certificates -
Prepare PDF
Download a single PDF containing certificates for all recipients
🧩 Generation Happens at Apply Time
Certificates are not pre-generated and stored in advance.
They are created dynamically when:
-
You apply them to a list
-
You download a bulk PDF
-
You send them by email or SMS
This ensures every certificate reflects the most current data available at the time of generation.
Saving Certificates in Bulk (Download PDF)
From the Apply screen, click Prepare PDF to generate a combined PDF file.
This allows you to:
-
Print certificates in bulk
-
Archive a full session’s certificates
-
Distribute printed copies in class
For name badges, Activity Messenger automatically aligns 6 per page for Avery 5392 paper.
5. Sending Certificates by Email or SMS
You can send certificates directly from the Certificate Creation interface.
Click Send.

This opens the New Message interface with the certificate automatically added as an Attachment.
From there, you can:
-
Choose the channel (email or SMS)
-
Select the communication type (marketing or non-marketing)
-
Define sender and reply settings
-
Confirm your audience
(This is where the data for your certificates is pulled from.) -
Send immediately or schedule for later
The selected audience determines which recipients receive a certificate and which data is used to populate placeholders.
How Certificates Are Delivered
-
Email
The certificate is embedded in the email as a downloadable image. -
SMS
Recipients receive a secure link that opens their personalized certificate in a browser.
In both cases, each recipient receives their own personalized version, generated at send time using placeholders.
Sending Certificates Outside the Apply Screen
You can also attach a certificate while creating any new message:
-
Open the New Message interface
-
Click Attachment
-
Select Certificate
-
Choose the certificate
The data source corresponds to your selected audience in the message.
This allows you to include certificates in broader communication workflows, such as:
-
End-of-session emails
-
Completion announcements
-
Instructor evaluations
-
Automated follow-ups
-
Template-based communications
➡️ For full details on the New Message interface, see Communications 103: Creating and Sending Messages.
6. Using Certificates in Templates
Certificates can also be inserted into reusable templates.
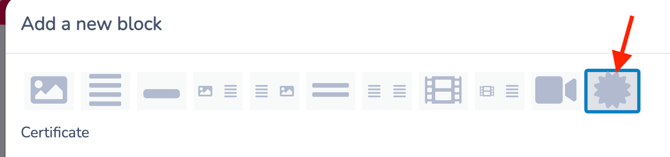
Use the Certificate block inside an email template.
Important:
If you edit a certificate that is used inside a template, the template will use the updated version of the certificate for future sends.
Previously sent certificates are not affected.
➡️ For a full walkthrough, see Creating and Using Email Templates.
When the template is sent:
-
One certificate is generated per recipient
-
Placeholders are automatically resolved
-
The certificate is embedded (email) or linked (SMS)
This is ideal for:
-
End-of-session emails
-
Automated completion workflows
-
Report cards
-
Assessment summaries
🧩 Certificate as a Message Asset
Templates define the message.
Certificates define the document.
When combined:
-
The template controls structure and wording
-
The certificate block generates personalized documents per recipient
-
The list controls who receives it
This keeps structure, data, and delivery cleanly separated.
7. Managing Certificates
The Certificates management screen allows you to organize, edit, filter, and control all certificates in your account.
To access it:
Go to More > All certificates
Each numbered element in the screenshot corresponds to a specific management function:
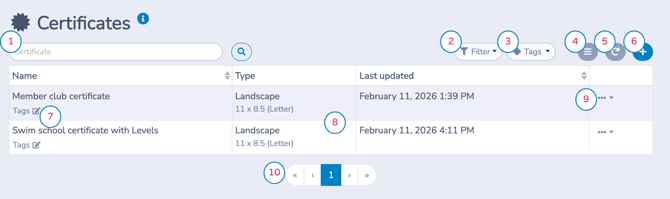
Interface Legend
(Click a title below to jump to its description)
| 1. Search | 6. New Certificate |
| 2. Filter | 7. Tags (inline editing) |
| 3. Tags | 8. Certificate Row (Open to Edit) |
| 4. Reorder Certificates | 9. Certificate Actions Menu (⋮) |
| 5. Refresh | 10. Pagination |
1. Search
Search certificates by name.
Useful when you manage multiple certificate designs across sessions or programs.
2. Filter
The Filter dropdown allows you to narrow the certificate list based on format or status.
Available filter options include: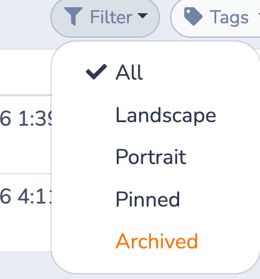
-
All
Displays every certificate in your account. -
Landscape
Shows only certificates designed in landscape format. -
Portrait
Shows only certificates designed in portrait format. -
Pinned
Displays certificates you have pinned for quick access. -
Archived
Shows certificates that have been archived and are no longer active.
Use filters to quickly locate the certificate you need, especially when managing multiple formats or large libraries.
3. Tags Filter
Use Tags to organize and filter your certificates.
Tags help you group certificates by:
-
Program (e.g., Swim School, Camps, Martial Arts)
-
Season (e.g., Winter 2026, Summer Session)
-
Level (e.g., Level 1, Advanced)
-
Cohort or class
Selecting a tag filters the list to show only certificates associated with that tag, making it easier to manage large libraries.
Certificate tags apply only to certificates.
They do not carry over to templates, media, forms, or other objects in the platform.
4. Reorder Certificates
Use the Reorder option to change the display order of certificates in the list. Drag and drop Certificates into the desired position.
This allows you to:
-
Prioritize frequently used certificates
-
Group related certificates together
-
Keep your most important certificates at the top
Reordering affects how certificates are displayed in your management list. It does not change certificate content or previously generated certificates.
5. Refresh
Refresh the list to display the most recent updates.
6. + New Certificate
Create a new certificate.
7. Tags (Inline Editing)
Add or modify tags directly from the certificate row.
This helps with quick organization without opening the certificate.
8. Certificate Row
Click anywhere on the certificate row to open and edit the certificate.
This takes you to the Certificate Design interface.
9. Certificate Actions Menu (⋮)
Click the three dots to open additional actions:
-
View or edit
Open the certificate design editor. -
Rename
Change the certificate name. -
Tags
Add or modify tags. -
Duplicate
Create a copy of the certificate design. -
Pin
Pin the certificate to keep it at the top of the list. -
Archive
Archive the certificate so it is no longer available for new sends.
Archived certificates:
-
Are removed from active selection lists
-
Remain visible in previously sent messages
-
Can be restored later if needed
10. Pagination
Navigate between pages when you have many certificates.
8. Best Practices
-
Design with placeholders from the beginning
-
Test Apply with real data before sending
-
Ensure background images leave enough white space
-
Use templates for recurring certificate workflows
🧭 Mental Shortcut
Certificates are reusable document blueprints.
Lists provide the data.
Messages provide the delivery.
Related guides
-
Communications 104: Message Assets
-
Communications 103: Creating and Sending Messages
-
Templates: Creating and Using Reusable Email Layouts
-
Quick Messages: Creating and Using Text-First Operational Messages
-
Media Library: Managing and Reusing Images, Videos, and Documents
-
Customizing Messages with Placeholders
-
Understanding the Rich Text Editor
-
Communications 102: Building and Managing Lists