

In Communications 101, we covered the foundational concepts behind messaging, recipients, and unsubscribes. In this guide, before moving on to creating and sending messages—we focus on lists, the engine that powers precise, compliant, and highly relevant communication in Activity Messenger.
Unlike traditional email marketing tools that rely mostly on static contact lists, Activity Messenger is deeply integrated with your forms, registrations, memberships, bookings, and client accounts. This allows you to build living, automatically updated audiences based on real activity—not just email addresses.
Even if Activity Messenger doesn’t include every feature found in generic email marketing platforms, it delivers something more valuable for sports, leisure, education, and service organizations: context-aware segmentation tied directly to participation, enrollment, and transactions.
Use this guide as a reference when you need to understand how Lists work, how to create them, and how to manage them over time.
Covered in this guide
Use this section to quickly find the list concept or setting you need.
Defining Lists and how they differ from Forms
Lists are used to organize, segment, and target recipients over time. At their core, a list is simply a collection of recipients that you can contact for a specific purpose—such as reminders, follow-ups, promotions, or announcements.
Workflow vs Method
The workflow is building the audience you want to contact. The method is creating or managing a List from the Lists area.
There are many ways to build lists in Activity Messenger, but the most fundamental and automatic one is through forms.
Reminder: Understanding Recipients
In Activity Messenger, a Recipient is any person who can receive an email or SMS message from your Organization.
A recipient:
-
Has a valid email address and/or mobile phone number
-
May or may not be the client account owner
-
May originate from multiple sources, such as forms, registrations, imports, or external systems
Activity Messenger automatically:
-
Validates email addresses and phone numbers
-
Prevents duplicate sends to the same recipient, even across multiple lists
-
Enforces unsubscribe status consistently across all communications and lists
This ensures your messages are delivered accurately, compliantly, and without unnecessary repetition.
➡️ These topics are covered in depth in Communications 101: Foundational Concepts & Managing Unsubscribes
Forms vs. Lists: How they work together
Forms are designed to collect data. You define the questions, and respondents submit their information in a specific context—such as a registration, survey, waiver, or booking.
As covered in Communications 101, when someone fills out a form:
-
A client account is automatically created or updated
-
That person becomes a recipient in Activity Messenger
-
Their contact information (email and/or mobile) is stored and validated
As a result, the Respondents section of every form effectively functions as a recipient list:
-
You can message respondents directly from the form’s Respondents tab
-
Form respondents can also be included in Master Lists, allowing you to combine multiple forms and lists you've created into a single, larger audience
Lists, on the other hand, are designed to organize and reuse that data. While a form captures information at a point in time, a list allows you to:
-
Group recipients across multiple forms, classes, or sources
-
Reuse the same audience for multiple communications
-
Build dynamic segments that evolve as people register, respond, or engage
In the sections that follow, you’ll learn how Activity Messenger supports list creation and management, and how lists connect to activity-driven data sources.
🧭 Orientation: What Lists are for
Lists help you define who should receive a communication.
Use Lists when you want to reuse an audience, combine recipients from multiple sources, filter recipients by activity, or build targeted messaging workflows.
🧩 Pattern: Lists are reusable audience definitions
In Activity Messenger, lists are building blocks, not destinations.
A list represents a definition of who should receive a message, not just a stored set of email addresses. Lists are designed to be reused, combined, and layered so you can target precise audiences without duplicating data or changing how forms, registrations, or memberships work.
Core ideas to keep in mind
-
Lists are composable
You can include multiple lists together and exclude one list from another to shape a final audience. -
Different list types play different roles
-
Some lists are activity-driven and dynamic (classes, events, memberships, form respondents).
-
Some lists are intentional and precise (upload lists), even if they contain only one participant.
-
-
Logic lives in Master Lists
Master Lists don’t create recipients themselves. They define how multiple lists interact through inclusion and exclusion. -
Exclusions always override inclusions
If a recipient appears in both an included list and an excluded list, they will not receive the message.
Why this matters
Thinking about lists this way allows you to:
-
Message large groups while excluding specific individuals
-
Reuse the same lists across multiple campaigns
-
Create one-off exceptions without modifying classes, tags, or registrations
-
Build communication workflows that stay accurate as participation changes over time
As you continue through this article, each list type and feature is best understood as part of this system.
Creating a new List
Lists are the foundation of audience segmentation in Activity Messenger. Once created, a list can be reused across messages, automations, and campaigns.
To create a new list:
-
Go to Lists and click + Create
-
Enter a List name
-
(Optional) Click Show to add a Description
Descriptions are for internal reference and help document the list’s purpose.
-
Select the type of list you want to create
-
Click Create
Once created, the list is immediately available throughout the Communications system and can be used for messaging, automations, and workflows.
Before sending messages, you must populate the list with recipients. Each list type has its own configuration options and data sources, which are covered in the dedicated articles linked below.
Available List types
When creating a list, you’ll be prompted to choose a list type. Each type corresponds to a different source of recipients and use case.
ℹ️ Each list type is covered in its own dedicated article with step-by-step instructions, examples, and best practices.
Click a list type below to open its dedicated documentation.
| List type | Use it when | Behaviour |
|---|---|---|
| Upload | You need to import recipients from Excel, CSV, or another system | Static or intentionally managed list |
| Class/Event Participants | You want to message people registered in activities | Dynamic, based on registrations |
| Tagged Clients | You want to target clients by CRM tag | Dynamic, based on client tags |
|
Master List |
You want to combine or exclude multiple sources | Composable audience logic |
| Amilia Integration | You use Amilia data as a recipient source | Depends on integration setup |
Each list type is designed to work seamlessly with Activity Messenger’s forms, registrations, memberships, bookings, and client accounts.
A Note on Membership Lists
When you sell or assign memberships to clients in Activity Messenger, a Membership-type list is created automatically.
These lists are system-generated and managed through the Memberships workflow.
For details on how memberships work, refer to the Memberships series of articles.
Managing Lists: interface overview
 The Lists screen is where you view, organize, filter, and manage all recipient lists used across Communications, Automations, and Campaigns.
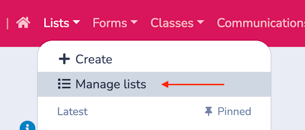
To access it, go to Lists > Manage lists.
Below is a breakdown of each element in the interface, corresponding to the numbered indicators in the screenshot.
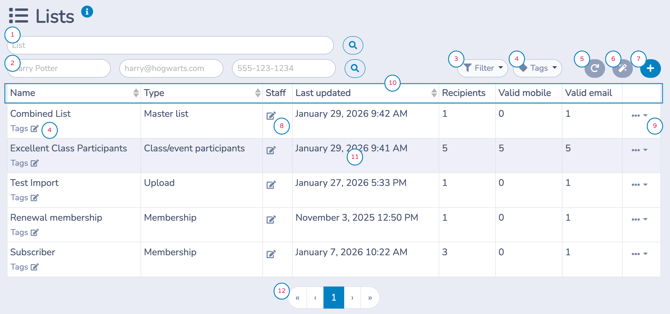
Interface Legend
Click any title below to jump to its description.
| 1. List Name Search | 7. Create New List |
| 2. Recipient Search | 8. Staff Permissions |
| 3. Filters | 9. List Actions Menu |
| 4. Tags | 10. Lists Table & Columns |
| 5. Refresh | 11. List Row |
| 6. Merge Two Lists | 12. Pagination Controls |
1. List Name Search
This search field allows you to quickly find a list by its name.
-
Type part or all of a list name
-
Press Enter or click the search icon to apply
-
Useful when managing a large number of lists across seasons or programs
2. Recipient Search (Name, Email, Mobile)
This secondary search lets you locate lists based on recipients contained within them.
You can search by:
-
Recipient name
-
Email address
-
Mobile number
- Click the orange x to reset your search criteria
This is especially useful when you:
-
Need to identify which list a specific person belongs to
-
Are troubleshooting delivery or subscription issues
3. Filters
The Filter dropdown allows you to narrow the list view based on list type.
4. Tags (Filter & Management)
Tags are the primary organizational tool for managing lists in Activity Messenger.
Tags applied here are list-specific and do not interact with tags used for other objects in the platform (such as clients or forms).
From the Lists interface, you can:
-
Tags dropdown (top): Filter the list view by one or more tags
-
Tags link on a list row: Assign, remove, or create tags for that specific list
Common tagging strategies include:
-
Season (e.g., Winter 2026)
-
Program or sport
-
Campaign or purpose
💡 Best practice: Consistent tagging makes long-term list management significantly easier.
5. Refresh
The Refresh button reloads the Lists view.
Use this after:
-
Creating or importing a new list
-
Editing list settings
-
Performing bulk actions
This ensures you are viewing the most up-to-date information.
6. Merge Two Lists
The Merge two lists feature lets you combine two Upload-based lists (or previously merged lists) into a single new list. This is helpful when you want to consolidate multiple imported lists into one audience before sending a message or building automations.
⚠️ This action is irreversible. The two original lists are permanently deleted. Review your lists carefully before merging.
How to Merge Two Lists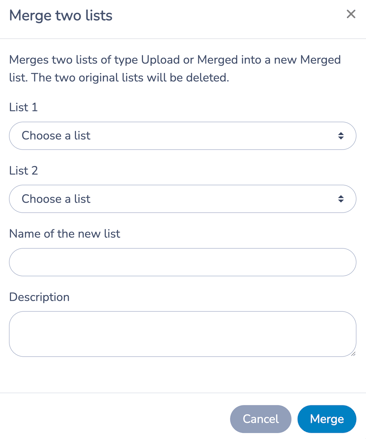
-
Click the Merge lists option (Magic wand icon)
-
In List 1, select the first list you want to merge
-
In List 2, select the second list you want to merge
-
Enter a Name for the new merged list
-
(Optional) Add a Description to document the purpose of the merged list
-
Click Merge to confirm
Once confirmed, Activity Messenger creates the new merged list and removes the two original lists.
What Happens After the Merge
-
A new merged list is created and appears in the Lists table
-
All recipients from both lists are included
-
Duplicate recipients are automatically handled to prevent duplicate sends
-
The merged list behaves like a standard Upload list and can be:
-
Used for email and SMS messaging
-
Tagged and filtered
-
Merged again with another Upload or Merged list if needed
-
When to Use Merge Two Lists
Use this feature when you need to:
-
Combine multiple Excel or CSV imports into one list
-
Consolidate audiences imported at different times
-
Clean up overlapping Upload lists before sending a campaign
💡 Tip: Choosing Between Merged Lists and Master Lists
Merged lists are static: they reflect the recipients present at the moment the merge is performed. This makes them ideal when you need to consolidate imported lists (such as multiple Excel or CSV uploads) into a single audience without creating additional list layers.
If your goal is simply to combine imported data and keep your list structure clean, merging lists is usually the better choice than using a Master List, as it avoids unnecessary list multiplication and complexity.
However, if you need a list that:
-
Updates automatically over time
-
Pulls recipients from registrations, forms, memberships, or other activity
-
Includes one or more imported lists alongside dynamic sources
then a Master List is the appropriate option.
🧩 This distinction reinforces how Activity Messenger separates data consolidation (merged lists) from audience logic (Master Lists).
7. Create New List
The + button opens the Create new list workflow. This is simply a shortcut to the same list creation process described in Section 2: Creating a New List of this article. Both entry points lead to the same configuration options and list types.
8. Staff Permissions
Staff permissions control which users are allowed to send messages to a specific list.
By default, the following user roles always have access to all lists:
-
Account Owners
-
Administrators
-
Communication Agents
This section is primarily used to allow staff members with the Instructor with messaging permission to send messages to a specific list, without granting them access to all communications or lists in the system.
How to grant list access to a staff member
-
Click the pencil icon in the Staff column for the desired list
-
In the permissions panel, select a user from the User dropdown
-
Click Save
Once granted, the selected user can send messages to this list using the messaging tools available to their role.
➡️ For a full explanation of user roles and permission levels, refer to the Users & Permissions article.
9. List Actions Menu (⋯)
The List Actions menu (three-dot icon) provides quick, contextual actions for managing an individual list.
This menu is used for list-level organization and lifecycle management, not for editing list content or recipients.
Available Actions
-
Rename
Update the list name to better reflect its purpose or audience. -
Tags
Add, remove, or manage tags associated with the list.
Tags help you organize and filter lists at scale (see Tags section). -
Pin
Pin the list to the Lists menu for quick access.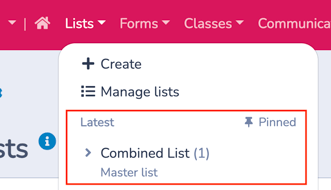
-
Archive
Archive the list to remove it from active views without deleting it.
Archived lists can be restored later if needed.
10. Lists Table & Columns
The main table provides a high-level overview of every list in your account, including:
-
Name – The list name
-
Type – Upload, Class/Event, Master list, Membership, etc.
-
Staff – Indicates staff-related lists when applicable
-
Last updated – Timestamp of the most recent change
-
Recipients – Total number of recipients in the list
-
Valid mobile – Number of recipients with a valid mobile number
-
Valid email – Number of recipients with a valid email address
The Lists table provides a high-level overview of all lists in your account, allowing you to quickly understand their size, type, and messaging potential.
Sorting Columns
You can sort the table by clicking the up/down arrows in any column header:
-
Alphabetical sorting (A–Z / Z–A) for text columns
-
Chronological sorting (newest to oldest or vice versa) for date columns
Sorting makes it easier to find large lists, recently updated lists, or specific list types when managing communications at scale.
11. List Row
Clicking on a list row opens that list’s Configuration panel.
From the configuration panel, you can view and manage settings specific to that list, depending on the list type.
For a complete walkthrough of each configuration panel and the options available per list type, refer to the dedicated articles linked in Section 2: Creating a New List.
12. Pagination Controls
Pagination controls appear at the bottom of the Lists screen and allow you to navigate through multiple pages of lists.
By default, 10 lists are displayed per page, helping keep the interface fast and easy to scan when managing a large number of lists.
Best practices for managing Lists
-
Use clear, descriptive list names
-
Apply consistent tags (season, program, purpose)
-
Archive lists you no longer actively use instead of deleting them
-
Regularly review recipient counts and valid email/mobile columns to ensure list quality
- 🧩 Use upload lists to manage temporary exceptions or exclusions instead of modifying classes, tags, or registrations.
Related guides
-
Communications 101: Foundational Concepts and Unsubscribe Management
-
Communications 103: Creating and Sending Messages
-
Communications 104: Templates and Quick Messages
-
Communications 105: Automating Email and SMS Messages
-
Managing Unsubscribes in Activity Messenger
-
Users & Permissions