

Automations allow Activity Messenger to send email and SMS messages automatically based on operational events, dates, and user actions.
Instead of manually sending reminders, confirmations, and follow-ups, you define communication rules once and the system executes them continuously.
Because Activity Messenger is deeply integrated with your forms, registrations, memberships, attendance data, and commerce activity, automations are context-driven. Messages are triggered by real operational events rather than static contact lists.
Automations are persistent rules. Once activated, they keep evaluating your Organization’s data and send messages when the configured trigger, timing, audience, and filter conditions are met.
They are different from scheduled messages, which are one-time messages sent at a specific date and time.
In this guide, you will learn how automations work, how to create them, and how to choose the correct automation type for your workflow.
Covered in this guide
Use this section to quickly find the automation concept or setting you need.
1. 🧭 Orientation: How Automations Work
Every automation has three components:
Trigger – What event or date starts the process?
Audience – Who qualifies to receive the message?
Message – What content is sent (email or SMS)?
Once activated, the system evaluates your data based on the configured trigger logic and sends messages when conditions are met.
⚙️ Automation System Model
Automations operate on three evaluation layers:
-
Data Layer – registrations, memberships, dates, attendance
-
Rule Layer – trigger + filters + timing logic
-
Execution Layer – message scheduling + delivery tracking
The system evaluates rules daily (or event-driven depending on trigger) and schedules messages when conditions are met.
Automations are:
-
Persistent
-
Re-evaluated continuously
-
State-aware
They are not one-time sends.
Automation Lifecycle Pattern
Trigger → Filter → Message → Analytics → Optimization
🧩 How Automations Interact with Other Systems
Automations rely on:
Lists → define recipients
Templates → define reusable structure
Placeholders → personalize content
Forms → trigger actions
Memberships → define lifecycle events
Classes / Events → define schedule-based triggers
Attendance → trigger date-based reminders
Understanding these dependencies helps you design stable workflows.
💡 Why Automate Messages?
Automations help you:
-
Save time by eliminating repetitive manual sends
-
Reduce errors and missed follow-ups
-
Improve operational consistency
-
Increase renewals and completed registrations
-
Reduce support inquiries
-
Standardize onboarding and reminders
Because Activity Messenger is deeply integrated with your forms, registrations, memberships, and activities, automations are context-driven, not generic.
2. 🧩 How Automations Work Together
Automations are modular.
They are built from interchangeable parts that can be combined to create structured communication workflows.
Triggers Define Timing
Every automation begins with a trigger.
The trigger determines when the rule activates.
Examples include:
-
A stored calendar date (birthday, expiration, start date)
-
A user action (form submission, abandonment)
-
A transaction (Amilia purchase or booking)
The structure of the automation does not change when the trigger changes.
Only the event that drives the timing changes.
Filters Are Modular
Filters refine who qualifies for a message.
You can combine filters to target:
-
Specific programs
-
Attendance status
-
Membership state
-
Form responses
Filters allow you to use one automation type in many operational scenarios without duplicating forms or lists.
Messages Are Reusable
Messages are independent from triggers.
You can:
-
Use Templates
-
Use Quick Messages
-
Reuse placeholder structures
-
Attach forms and documents
The same message structure can be used across multiple automations with different triggers.
Automations Can Stack
Multiple automations can apply to the same contact at different moments.
For example:
-
Activity Start → Welcome email
-
Class Reminder → Weekly reminder
-
Activity End → Feedback survey
-
Membership Renewal → Retention reminder
Each automation operates independently but follows the same core pattern.
This allows you to build layered communication systems tied to your operational lifecycle.
💡 Why This Matters
Instead of thinking:
“What message should I send?”
Think:
“What event should trigger communication?”
Once the trigger is clear, the rest becomes configuration.
Automations are not isolated features.
They are building blocks for reliable, scalable communication infrastructure.
3. Creating an Automation
All automations are created from:
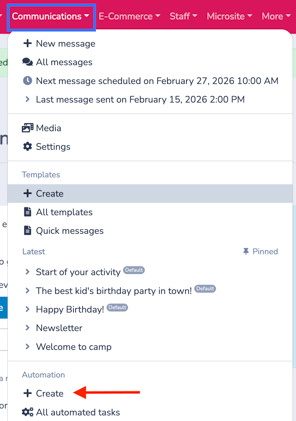
Communications > Automation > + Create
Steps
-
Name your automation and (optionally) add an internal description
-
Select a Trigger (automation type)
-
Toggle Send automatically: Yes

-
Define Timing
-
Choose Recipients
-
Configure Message
Each trigger type then applies its own specific logic (for example, start date, expiration date, form submission, etc.).
Below, we briefly describe what each automation type can do.
This guide gives an overview of the automation types. Detailed setup instructions are covered in each dedicated automation guide.
4. Automation Types
Automations fall into two main categories.
Click on a title below to jump directly to that section.
📅 Date-Based Automations
⚡ Action-Based Automations
A. Date-Based Automations
Triggered by a known date in the system.
B. Action-Based Automations
Triggered by user behavior.
5. Managing Automated Tasks
Once an automation is created, you can manage and adjust it at any time.
Automations are not static.
They can be edited, paused, reviewed, or archived as your operational needs evolve.
Accessing the Automation Manager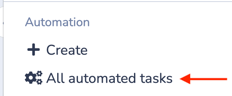
Go to Communications > Automation > All Automated Tasks
This opens the Automated Task Manager, where all automations are listed.
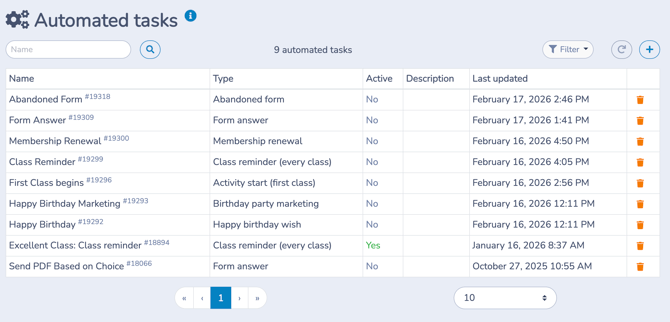
Each row shows the Name of the automation, its type, whether it is active or not, its description and the last time it was updated.
What You Can Do from the Automation Manager
- Search
Search automations by name to quickly locate a specific rule. - Filter by Automation Type
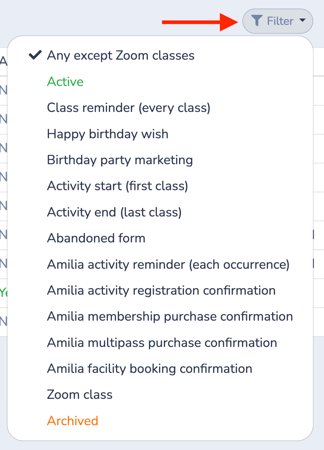
Filter by trigger type (e.g., Activity Start, Membership Renewal, Form Answer).-
This is useful when managing multiple automations across different workflows.
-
 Refresh
Refresh the list to display the latest updates.-
➕ Create a New Automation
Click the blue (+) button to create a new automated task. - Edit an Automation
Click on any row to open the automation editor and modify settings.-
From an existing automation, you can:
-
Edit the message
-
Change the timing
-
Adjust the audience
-
Modify advanced options
-
Pause the automation (toggle Send automatically: No)
-
Review message logs
-
Changes take effect immediately after saving.
-
-
-
 Archive an Automation
Click the orange trash icon to archive an automation.-
Archived automations:
-
Stop sending messages
-
Are not deleted
-
Can be recovered using the Filters
-
-
-
Pagination Controls
Use pagination at the bottom of the screen to navigate between pages when managing a large number of automations.
Operational Best Practice
Regularly review your automations to ensure:
-
Timing is still accurate
-
Messaging reflects current policies
-
Outdated workflows are archived
-
Duplicate rules do not exist
Well-maintained automations become reliable operational infrastructure.
Automations update dynamically.
You can create them even before registrations exist — the system will evaluate conditions daily.
6. Managing an Automation: Settings, Messages, Analytics
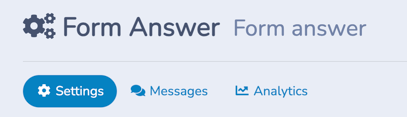
Every automation has three operational tabs at the top: Settings, Messages, and Analytics.
These tabs allow you to configure, monitor, and evaluate your automation.
Think of them as:
⚙️ Settings
The Settings tab is where the automation logic lives.
This is the tab covered in each dedicated automation article and where you will spend most of your time when creating or modifying an automation.
Here, you define:
-
The trigger
-
Timing
-
Recipients
-
Filters
-
Advanced options
-
Message content
If you need to change:
-
When messages send
-
Who qualifies
-
Which list, class, or membership is selected
-
The message itself
You edit it here.
Changes take effect immediately after saving.
🧭 How to Use This Tab
Use this tab to create and configure your automations.
It is also where you modify existing automations.
If you want to:
-
Adjust when messages send → Update Timing
-
Change who receives the message → Update Recipients or Filters
-
Modify the content → Edit the Message configuration
-
Pause the automation → Toggle Send automatically to No
-
Refine the logic → Adjust Advanced options
Use this tab whenever the rule itself needs to change.
Settings define how the automation behaves going forward.
If the rule changes, future scheduled messages will update accordingly.
Most automation types include a Simulation panel to preview scheduled messages before they send.
💬 Messages
The Messages tab shows all message instances generated by this automation.
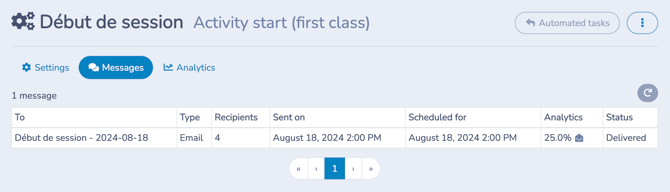
Each row represents a specific send created by the rule.
You can see:
-
To — The message name or reference
-
Type — Email or SMS
-
Recipients — Number of recipients
-
Sent on — When the message was actually sent
-
Scheduled for — The planned send date and time
-
Analytics — Engagement metrics (such as open rate)
-
Status — Delivery status (Delivered, Scheduled, Failed, etc.)
This tab allows you to:
-
Confirm that a message was sent
-
Verify how many recipients received it
-
Check whether it was delivered successfully
-
Review scheduled messages before they go out
-
Access performance metrics directly from the list
Send Out Details Panel
Clicking on any send-out row opens the Send Out Details Panel.
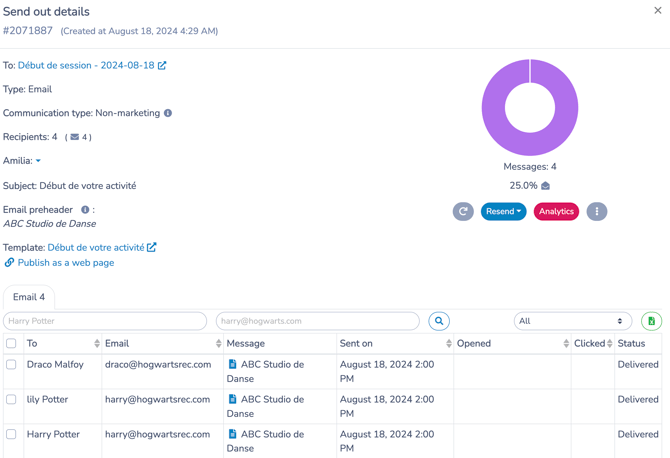
This panel provides:
-
Message metadata (subject, template, communication type)
-
Recipient-level delivery status
-
Open and click tracking
-
Conversion tracking (if applicable)
-
Resend and analytics options
➡️ The Send Out Details Panel is covered in depth in Communications 106 – Managing Messages and Analytics.
🧭 How to Use This Tab
If you want to:
-
Confirm a message went out → Check the Messages tab
-
Investigate delivery issues → Open the Send Out Details panel
-
Review engagement for a specific send → Open that send’s Analytics
Settings define what should happen.
Messages show what actually happened.
📊 Analytics
The Analytics tab shows performance results for messages generated by this automation.
It summarizes both delivery and engagement metrics so you can evaluate how well the automation is performing.
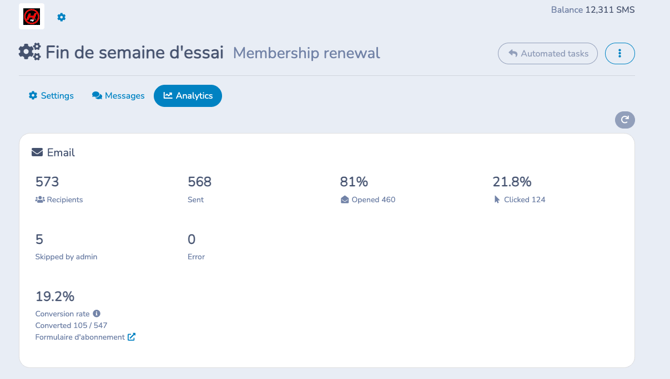
For Email automations, you can see:
-
Recipients — Total number of recipients
-
Sent — Messages successfully sent
-
Opened — Number and percentage of recipients who opened the message
-
Clicked — Number and percentage of recipients who clicked a link
-
Skipped by admin — Messages manually skipped
-
Error — Messages that failed to send
Conversion Tracking
If your automation email includes a link to a form, a Conversion rate section appears automatically in the Analytics tab.
A conversion is recorded when a recipient submits the linked form.
If that form is a payment form, the conversion represents a completed sale.
Conversion tracking measures:
-
How many recipients completed the linked form
-
The percentage of recipients who converted
This is commonly used for:
-
Membership purchase links
-
Product and upsell marketing
-
Renewal forms
-
Registration forms
-
Trial-to-paid upgrades
Example
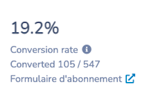
A 7-day membership trial ends.
After 7 days, an automation email is sent with a link to purchase a membership.
If 19.2% of recipients complete the purchase form, the automation displays a 19.2% conversion rate.
This allows you to measure not just engagement (opens and clicks), but real operational outcomes.
What This Tab Is For
Use the Analytics tab to:
-
Measure engagement performance
-
Compare open and click rates
-
Identify delivery issues
-
Evaluate subject line and content effectiveness
-
Monitor revenue and conversion impact
Analytics help you assess how well your automation is performing over time.
🧭 How to Use This Tab
Use this tab to understand performance trends and decide whether your message content or timing needs improvement.
Analytics measure results.
They do not change automation logic.
If adjustments are needed, return to the Settings tab to update the automation.
🧩 How These Tabs Work Together
Think of an automation as a three-layer system:
-
Settings → Defines the rule
-
Messages → Shows what the rule executed
-
Analytics → Measures how well it performed
You configure in Settings.
You monitor in Messages.
You optimize using Analytics.
7. 🧭 Decision Clarity: Which Automation Should You Use?
Use this matrix to choose the correct automation type based on what initiates the message.
Step 1 — What Triggers the Message?
| If the message is triggered by… | Use this automation |
|---|---|
| A participant’s birthday | 🎂 Happy Birthday or 🎉 Birthday Marketing |
| The first class of a program | 🎬 Activity Start |
| The final class of a program | 🏁 Activity End |
| Every scheduled class occurrence | 📅 Class Reminder |
| A membership expiration date | 🔁 Membership Renewal |
| A form submission | 📝 Form Response |
| A form started but not completed | 🛒 Abandoned Form |
Step 2 — Is It One-Time or Rule-Based?
| If you want to… | Use |
|---|---|
| Send one message at a specific date and time | Schedule a Message (Communications 103) |
| Create a rule that runs automatically over time | Use an Automated Task |
Step 3 — Think in Terms of What Drives Timing
| Timing is driven by… | Automation Type |
|---|---|
| A stored calendar date (class schedule, event) | Date-Based Automation |
| A user action (submission, abandonment) | Action-Based Automation |
🧭 Quick Decision Rule
Ask yourself:
“What event should cause this message to send?”
The answer determines the automation type.
You are not choosing based on the message content.
You are choosing based on the trigger.
Why This Matters
Choosing the correct automation:
-
Prevents duplicate or missed messages
-
Ensures accurate timing
-
Reduces manual intervention
-
Keeps workflows predictable
8. Next Steps
- Explore dedicated workflow articles for each automation type
- Review your core operational workflows (registration, onboarding, renewal)
- Identify repetitive communications
- Automate them once
Related guides
-
Communications 103: Creating and Sending Messages
-
Communications 104: Message Assets
-
Communications 102: Building and Managing Lists
-
Messaging Defaults
-
Templates: Creating and Using Reusable Email Layouts
-
Quick Messages: Creating and Using Text-First Operational Messages
-
Personal Information and Electronic Message Laws in Canada and the USA