
Activity Messenger can automatically match Interac e-Transfer deposits to outstanding invoices when confirmation emails are forwarded to interac@am.lol. Once received, Activity Messenger reads the confirmation email, matches it to the related invoice, and marks the invoice as Paid.
When Activity Messenger receives the forwarded confirmation email, it looks for the payment identifier in the email body and uses it to match the deposit to the related invoice.
If the client did not enter the AmInUmId payment identifier, Activity Messenger will try to match the payment using the client’s email address and full name.
If none of those fields match an outstanding invoice, Activity Messenger will show a warning on the dashboard indicating that the Interac e-Transfer must be settled manually.
If you use Microsoft Outlook or Gmail, you can create an email rule or filter to automatically forward these confirmation emails.
⚠️ Important: If you are using Microsoft 365 or Google Workspace for business, ensure before you begin that email forwarding is not prohibited in your administrator settings.
Covered in this guide
Use this section to quickly find the step you need.
Before you start
Before creating the forwarding rule, make sure:
-
Interac e-Transfer is enabled in Activity Messenger.
-
Your Organization uses Auto-Deposit for Interac e-Transfers.
-
The deposit confirmation emails arrive in the inbox where you will create the rule.
-
Your email administrator allows automatic forwarding.
-
You have permission to create rules or filters in Outlook, Microsoft 365, Gmail, or Google Workspace.
1. Outlook: Create an automatic forwarding rule
Step 1: Open Rules & Alerts
- In Outlook, click Info.
- Select Manage Rules & Alerts.
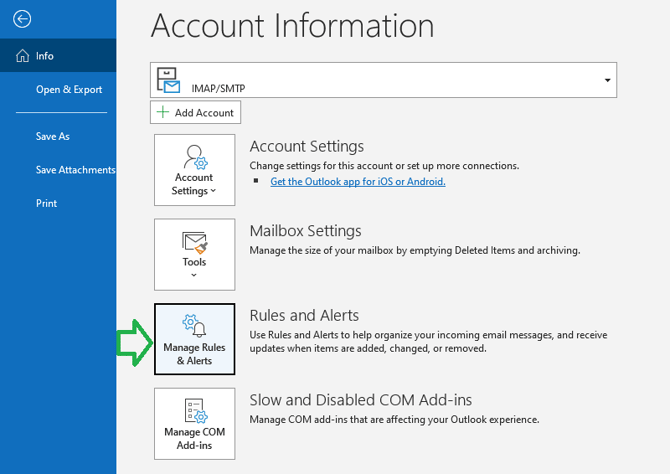
3. Click New Rule.
Step 2: Start a New Rule
- Choose Apply rule on messages I receive.
- Click Next.
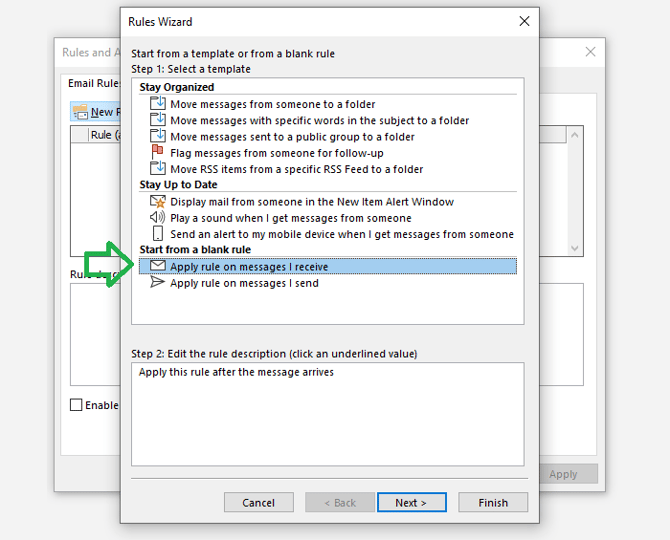
Step 3: Define the Rule Conditions
You will add two conditions to ensure only valid Interac e-Transfer deposit emails are forwarded.
Condition 1: Sender Address
-
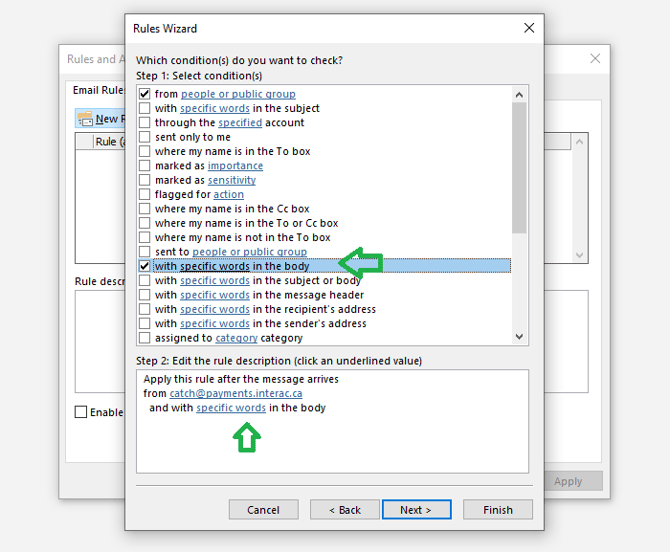
In Step 1, check from people or public group.
-
In Step 2, click people or public group.
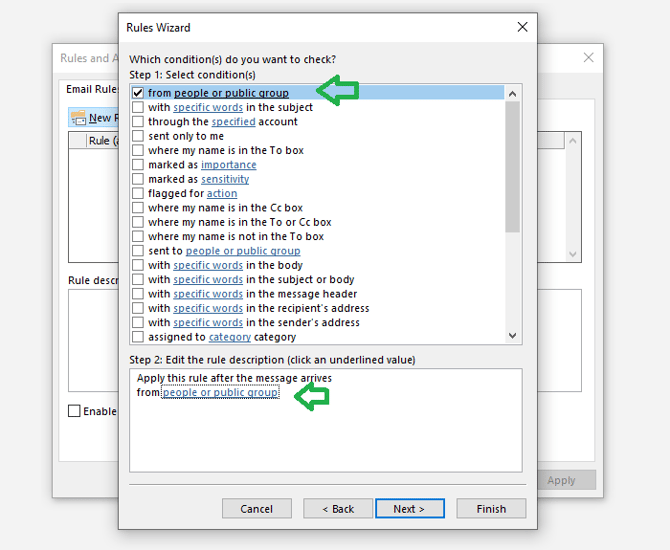
3. In the From field, add the sender addresses used by Interac:
-
-
catch@payments.interac.ca
-
notify@payments.interac.ca
-
4. Click OK to save.
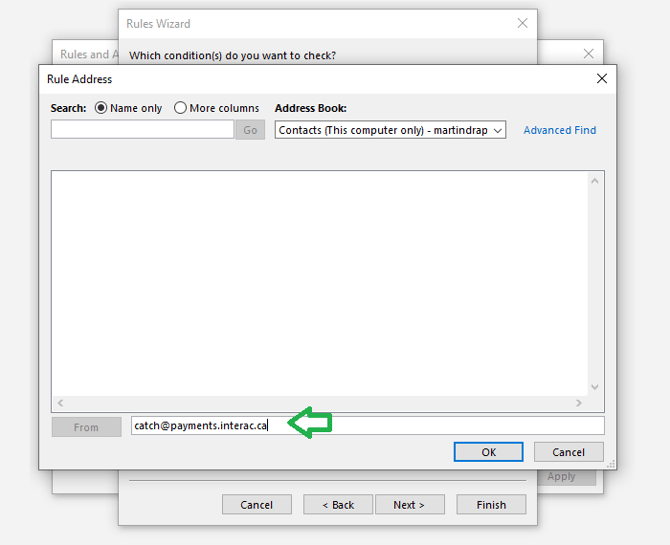
Condition 2: Unique Identifier
-
In Step 1, also check with specific words in the body.
-
In Step 2, click specific words.
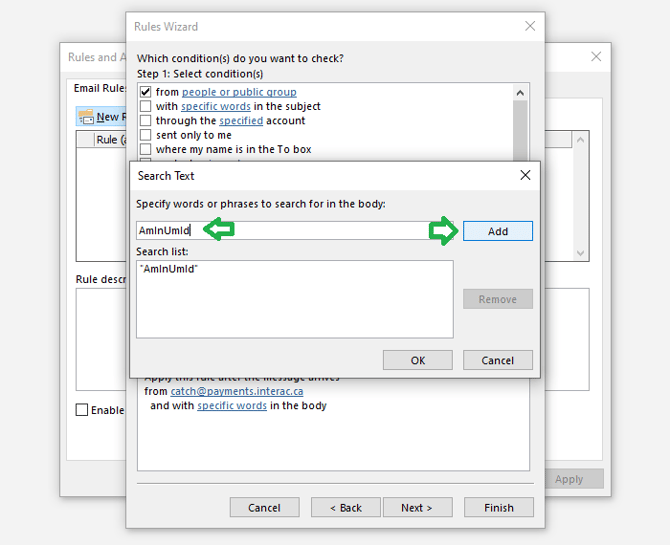
3. Enter AmInUmId and click Add.
4. Click OK.
Click Next to continue.
💡 Important: The keyword AmInUmId is case sensitive. Any typo or formatting change will prevent the rule from working.
Step 4: Set the Forwarding Action
-
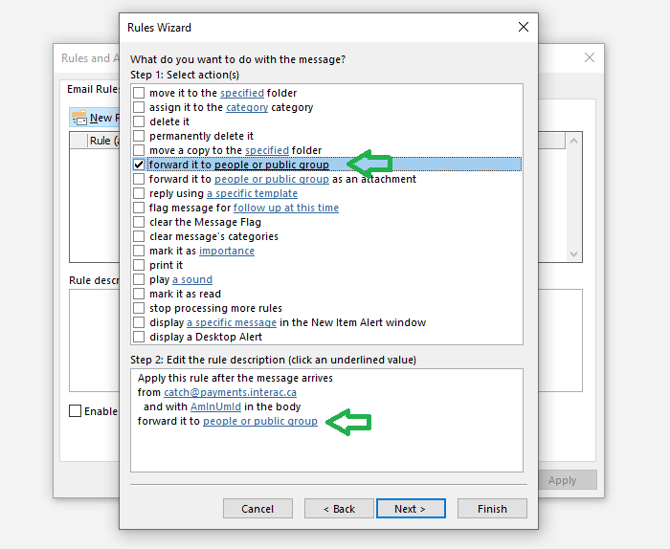
In Step 1, check forward it to people or public group.
-
In Step 2, click people or public group.
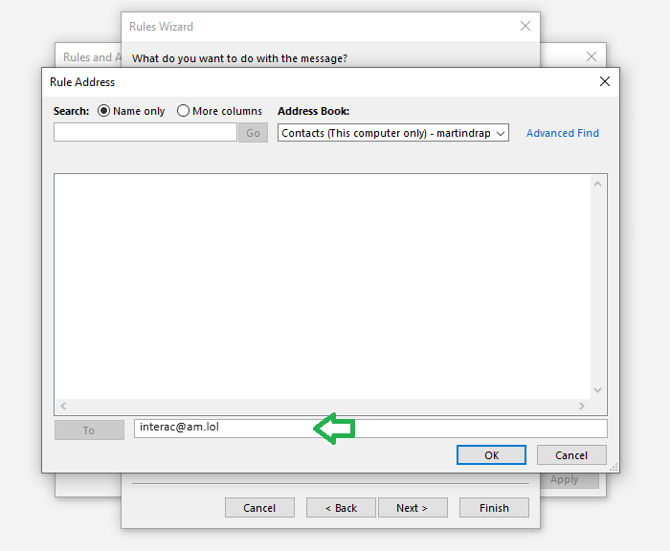
3. In the To field, enter:
interac@am.lol
4. Click OK to save.
Step 5: Save the Rule
-
Click Next.
-
Review the rule settings.
-
Click Finish, then Apply.
Your Outlook rule is now active.
2. Gmail: Create an automatic forwarding filter
Use this section if your Interac e-Transfer confirmation emails are received in Gmail.
Before creating the filter, you must first add the Activity Messenger forwarding address to Gmail.
Step 1: Add the forwarding address
-
Open Gmail.
-
Click the gear icon in the top-right corner.
-
Select See all settings.
-
Open the Forwarding and POP/IMAP tab.
-
Click Add a forwarding address.
-
Enter: interac@am.lol
-
Follow Gmail’s instructions to confirm and approve the forwarding address.
⚠️ Important: Do not enable automatic forwarding for all emails unless you want every incoming email forwarded. For this workflow, you should use a filter so only matching Interac e-Transfer confirmation emails are forwarded.
Step 2: Create the filter
-
In Gmail, click the gear icon in the top-right corner.
-
Select **See all settings**.
-
Open the **Filters and Blocked Addresses** tab.
-
Click **Create a new filter**.
-
In the From field, enter the Interac sender addresses:
-
catch@payments.interac.ca OR
-
notify@payments.interac.ca
-
-
In the Has the words field, enter: "AmInUmId"
-
Click Create filter
-
Select Forward it to
-
Choose: interac@am.lol
-
Click Create filter.
Gmail will now forward new matching Interac e-Transfer confirmation emails to Activity Messenger.
⚠️ Important: "AmInUmId" is case sensitive. Enter it exactly as shown. If the keyword is misspelled or changed, Activity Messenger may not be able to match the payment to the correct invoice.
Test the forwarding rule
After creating the filter, test it with a new Interac e-Transfer payment.
Confirm that:
-
The Interac confirmation email arrives in Outlook or Gmail.
-
Outlook or Gmail forwards the email to interac@am.lol.
-
The related invoice is marked as paid in Activity Messenger.
-
Unrelated emails are not forwarded.
Related guides
-
Payment & Financial Configuration
-
Understanding the Billing Page
-
Sending Emails from Your Own Domain
-
Messaging Defaults