

These automations are date-based and use each participant’s individual activity schedule.
-
Activity Start (First Class) sends a message before or after the first class.
-
Activity End (Last Class) sends a message before or after the final class.
Use them to automate onboarding, reminders, follow-ups, and retention workflows tied to a program’s lifecycle.
📌 At a Glance
Activity Start and Activity End are lifecycle-based automations that send messages relative to each participant’s first or final scheduled class date.
Use it when
You need to send onboarding, reminder, follow-up, survey, or retention messages tied to the beginning or end of a program.
Inputs
• Selected automation type (Activity Start or Activity End)
• Timing configuration
• Recipient source (Lists, Forms, or Individual Classes)
• Optional advanced filters
• Message content
Outputs
• Scheduled email or SMS messages
• Participant-specific send timing based on first or final class date
• Message logs and analytics
Key rules
• Timing is calculated per participant, not globally per activity.
• Activity Start uses the participant’s first scheduled class date.
• Activity End uses the participant’s final scheduled class date.
• Advanced options can further restrict who receives the message.
• Attendance-based filtering should not be used with first-class sends.
Common variations
• Welcome and onboarding emails
• Camp preparation messages
• End-of-session surveys
• Re-enrollment promotions
• Certificate follow-ups
Related automations
Class Reminder • Form Response • Membership Renewal
Covered in this guide
Use this section to quickly find the Activity Start or Activity End setting you need.
1. When to Use Them
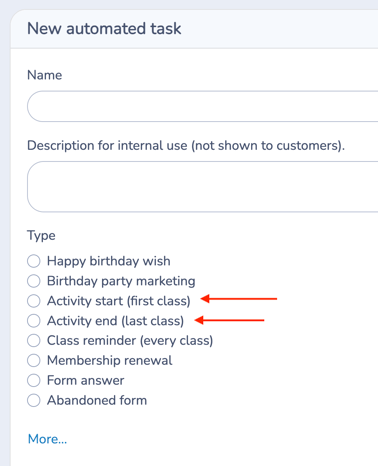
Activity Start (First Class)
-
Welcome message before a program begins
-
Logistics reminder (time, location, what to bring)
-
Collect required documents (consent, medical forms)
-
First-day preparation instructions
Activity End (Last Class)
-
End-of-session reminders
-
Satisfaction surveys
-
Re-enrollment promotions
2. 🧭 How These Automations Work
Both automations are triggered by each participant’s individual schedule.
| Automation Type | Trigger Reference |
|---|---|
| Activity Start | Participant’s first class date |
| Activity End | Participant’s final class date |
The system:
-
Identifies the relevant occurrence (first or last)
-
Calculates timing based on your configuration
-
Sends only to participants registered in the selected activity
You are defining a lifecycle rule, not scheduling a one-time message.
Timing is calculated per participant, not per activity globally.
3. Step-by-Step Guide
The setup is identical for both types.
Only the trigger selection differs.
Step 1: Create the Automation
-
Go to Communications > Automation > + Create
-
Enter a clear Name for your automation
-
(Optional) Add an internal description explaining what the automation does
-
Select:
-
Activity Start (First Class)
-
or Activity End (Last Class)
-
-
Enable sending by toggling Send automatically: Yes
Step 2: Set timing
Define how many days before or after the first/last class the message should send.
-
Use 0 and specify a send time to deliver the message on the same day as the first or final class.
- Timing is calculated from the participant’s scheduled first or final class, not from the registration date.
Step 3: Define Your Recipients
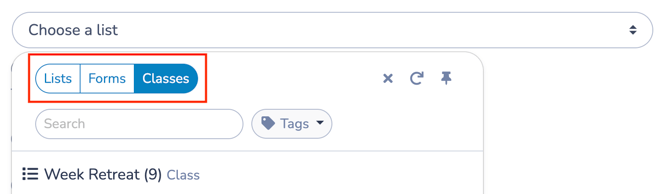
Choose where recipients come from:
Option A: Lists (Recommended)
Use a dynamic list that updates automatically as participants register.
Best when:
-
You want one automation to apply across multiple activities
-
You group classes by category or tags
-
You want flexible, reusable logic
This is the recommended approach for most workflows.
Option B: Forms
Use this when you want the automation to apply only to registrations coming from a specific form.
Best when:
-
A program has its own dedicated registration form
-
You want to isolate communication to one intake workflow
Option C: Individual classes
Use this when the automation should apply to one specific class only.
Best when:
-
Communication is unique to a single activity
-
You do not need dynamic grouping
Important Notes
-
Tags are contextual.
-
When selecting classes, you will see class tags.
-
When selecting forms, you will see form tags.
-
When selecting lists, you will see list tags.
-
-
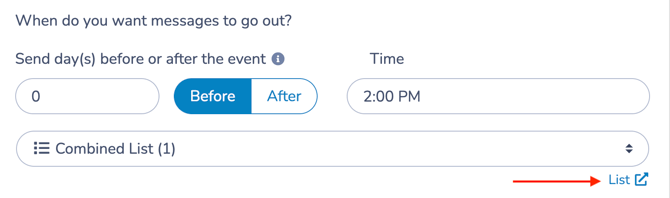
After selecting an audience, a link appears allowing you to open:
-
The selected List
-
The selected Form
-
The selected Class attendance list
-
This allows you to verify exactly who qualifies for the automation.
Step 4: Configure Advanced Options (Optional)
Advanced Options allow you to further restrict who receives the message.
They act as filters.
If a participant does not meet the selected condition, the message will not send to them.
Available Options
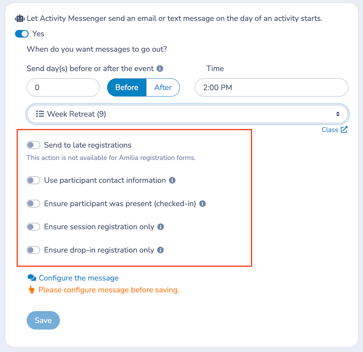
-
Send to late registrations
Sends the message to participants who register after the scheduled send date.
Use this when late registrants still need the information. -
Use participant contact information
Sends the message to the participant instead of the account owner (if available).Useful for:
-
Teen programs
-
Adult classes
-
-
Ensure participant was present (checked-in)
Sends only to participants marked as present. If not checked in, the message will not send.
⚠️ Warning
Do not enable this option when using an automation triggered by:
Start of an activity (first class)
At the time of the first-class trigger, attendance data does not yet exist.
This combination may prevent the message from sending.
-
Ensure session registration only
Sends only to participants registered for the full session. -
Ensure drop-in registration only
Sends only to participants registered as drop-ins.
Step 5: Configure Your Message
Click Configure the message
-
Choose one:
-
Write a new message
-
Select a Template
-
Select a Quick Message
-
-
Add attachments if needed (e.g., consent form)
➡️ If you need help creating your message, refer to the Communications 103 and 104 guides.
Step 6: Save and review the Simulation
Click Save to activate the automation.
Once saved and set to Send automatically: Yes, the automation will begin sending messages according to your configured timing and filters.
Automation Simulation
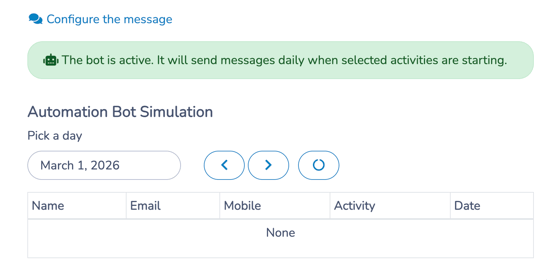
At the bottom of the automation configuration page, you will see the Simulation panel.
The Simulation automatically displays scheduled messages based on your current settings.
It allows you to verify:
-
Which participants qualify
-
Which first or final class dates are detected
-
When messages are scheduled to send
The Simulation does not send messages.
It simply reflects what the automation has already scheduled.
💡 Best practice:
After saving your automation, review the Simulation panel and check upcoming dates to confirm everything is working as expected.
4. 🧩 Key Configuration Notes
Activity Start (First Class)
-
Timing is calculated from each participant’s individual first class date
-
Automatically excludes contacts not registered in the selected activity
-
Ideal for onboarding workflows
Activity End (Last Class)
-
Timing is calculated from each participant’s individual final class date
-
Works with all list types, including Master Lists
-
Ideal for surveys and retention workflows
Both support:
-
Placeholders (Parent name, Participant name, Activity name, Date, Group)
-
Attachments (forms, surveys, documents)
5. Common Workflows
When to use Activity Start and Activity End
Use Activity Start when you want to prepare participants before their first class or follow up shortly after they begin.
Common examples include:
- Welcome messages
- Preparation instructions
- What to bring
- First-class reminders
- Introductory resources
- Early follow-ups
Use Activity End when you want to follow up near the end of a participant’s activity.
Common examples include:
- End-of-session surveys
- Certificate follow-ups
- Re-enrollment reminders
- Next-step instructions
- Thank-you messages
- Retention campaigns
Below are common operational patterns organizations build using Activity Start and Activity End automations.
Each example shows the goal, timing configuration, and the practical outcome.
🧩 Pattern: Activity Lifecycle Communication
Activity Start and Activity End automations are often used together
to communicate with participants at key moments in a program lifecycle.
1️⃣ Standard Program Onboarding
Goal: Prepare participants before the first class.
Setup: Activity Start → Send 7 days before → Include schedule + consent form
Result: Participants arrive informed and prepared.
2️⃣ Pre-Camp Information Email
Goal: Prepare families with key logistics before the camp begins.
Setup: Activity Start → Send 3–7 days before → Include group assignment, instructor name, drop-off location and time, participant barcode (for automated attendance tracking), security password, and link to the Parent Guide.
Result: Parents arrive prepared with required information, reducing check-in delays and operational questions.
3️⃣ Same-Day Camp Reminder
Goal: Reduce no-shows.
Setup: Activity Start → Send 0 days before → Include drop-off instructions
Result: Improved punctuality.
4️⃣ End-of-Session Feedback
Goal: Gather participant feedback.
Setup: Activity End → Send 1 day after → Attach survey form
Result: Higher response rates.
5️⃣ Re-enrollment Promotion
Goal: Increase retention.
Setup: Activity End → Send 3 days before final class → Include registration link
Result: Participants re-register before session ends.
6️⃣ Attendance-Based Certificate
Goal: Contact only attendees.
Setup: Activity End → Enable “Ensure participant was present” → Send certificate
Result: Only eligible participants receive follow-up.
7. 🧭 Workflow Design Tip
Use Activity Start and Activity End when communication is tied to a program’s lifecycle.
If timing depends on:
-
Every class occurrence → Use Class Reminder
-
A form submission → Use Form Response
-
A membership expiration → Use Membership Renewal
Think in terms of what initiates the message:
-
First class → Activity Start
-
Final class → Activity End
Related guides
-
Communications 105: Automating Email and SMS Messages
-
Class Reminder Automation
-
Birthday Automations
-
Communications 103: Creating and Sending Messages
-
Communications 102: Building and Managing Lists
-
Quick Messages: Creating and Using Text-First Operational Messages
-
Templates: Creating and Using Reusable Email Layouts
-
Personal Information and Electronic Message Laws in Canada and the USA